Almost every task that SaaS software user has to complete involves interacting with several tools at once. In fact, on average, clients of B2B products access about eight different tools during the day. They get used to switching between browser tabs, sometimes even without thinking of it.
To enhance this experience and attract more clients to their products, SaaS companies invest in building integrations. However, from our experience as a UI/UX design agency for SaaS, we can state that integration design that would add maximum value to your users’ experience and meet their end goals requires a lot of planning and thorough research before moving to the technical implementation. That’s a challenging process even for experienced designers.
To help you deal with this complex task, in this article, we will share with you a step-by-step plan on how to design integration. But first of all, to convince you that the game is worth the candle, here are several benefits of integrated design.
Why integrating SaaS with other systems matters
Software never exists in a vacuum. Each app lives in its ecosystem with numerous rivals, alternatives, and potential partners. There’s probably no customer in the world that can satisfy all their needs using one technology only. So, in today’s crowded market, numerous businesses choose to build integrations to help them
- Save time.
Perhaps this one is the most obvious benefit of all and the main reason for many businesses to employ SaaS integration. Integrations save time by allowing companies to automatically transfer data between apps without having to enter it manually. Users just need to set up the initial integration quickly and can start taking advantage of the possibilities it gives.
For example, imagine you use Shopify to run your online business, and Freshbooks to send invoices, track expenses, and fulfill other accounting jobs. You need all the info about online purchases to be forwarded to the accounting system so that orders can be booked and processed by your team. Thanks to integrations, the information could be automatically transferred from Shopify to FreshBooks, so you won’t need to do anything manually. What a time saver, right?

- Reduce human error.
When people enter data manually there's always a risk of making a mistake that can cost hundreds or thousands of dollars (even if it's a very tiny mistake). You then have to invest time and energy into identifying and fixing the problem, not to mention the reputational damage that may be done to your vendor or yourself as a result of the blunder. With AI integration, you can automatically transfer the needed information from one app to another without having to rely on a third party. This greatly reduces human error or even eliminates it.
- Increase transparency.
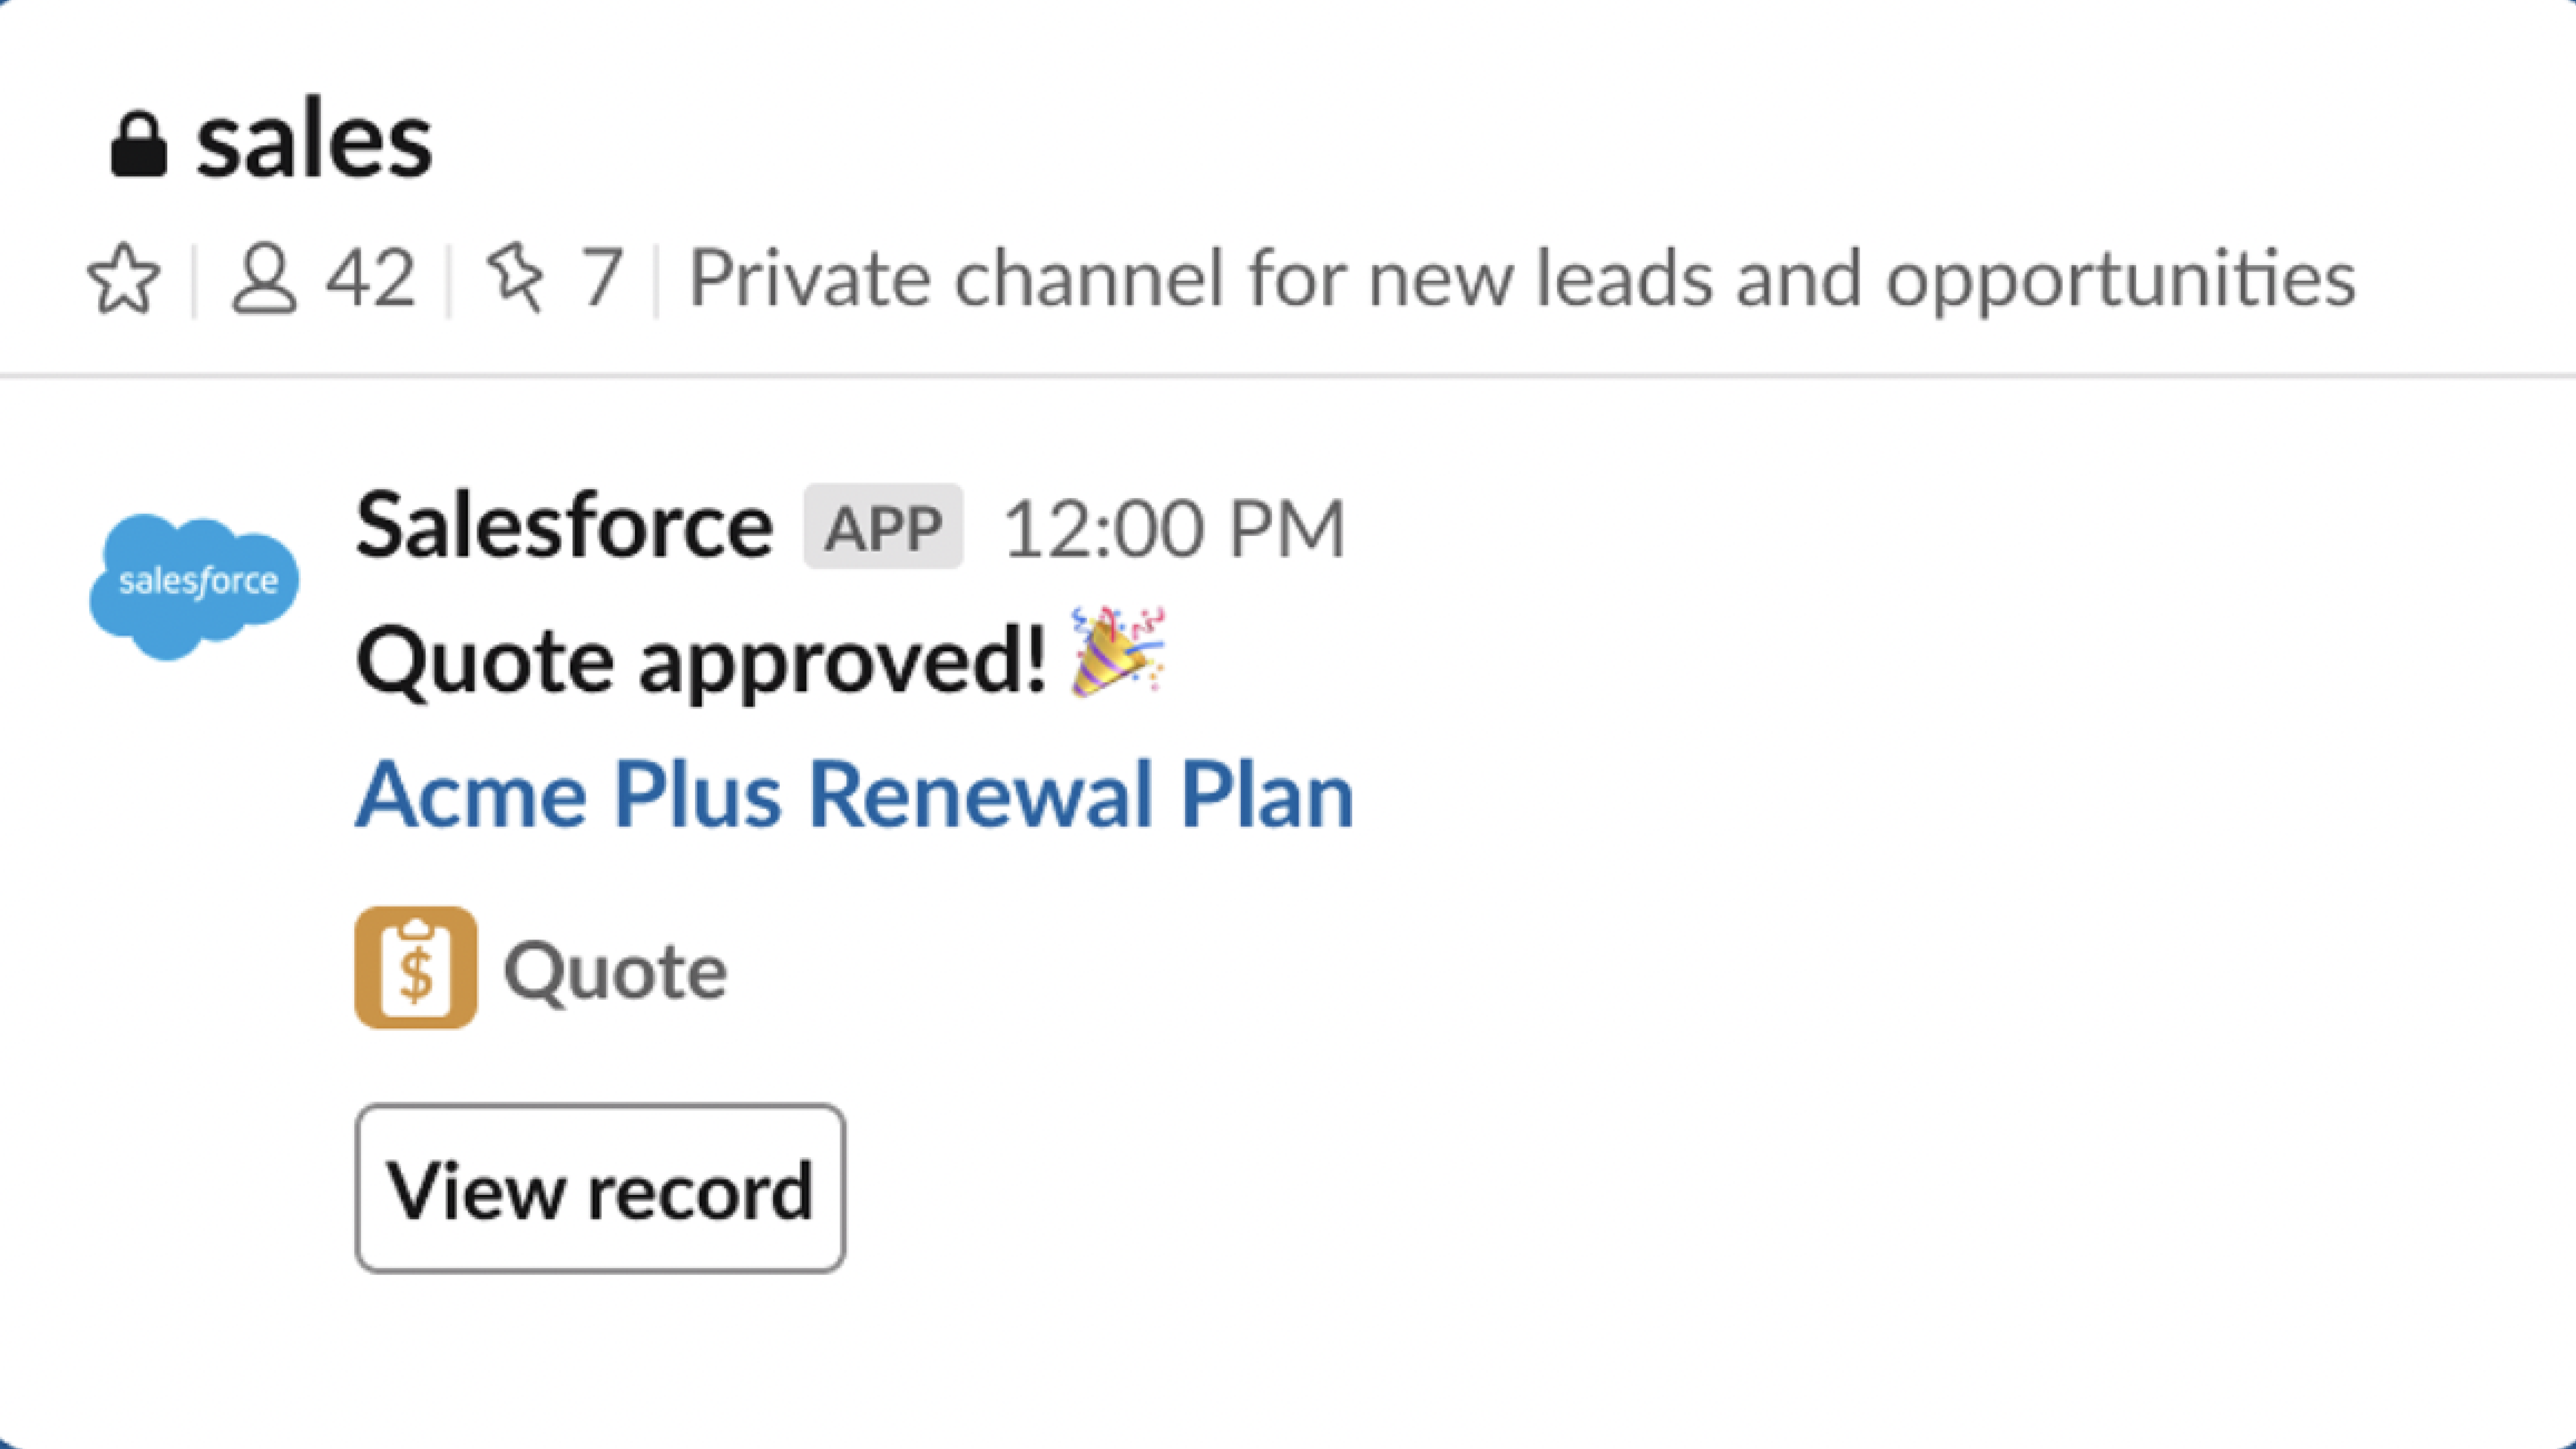
When your teammates have urgent questions, they need to search for an answer either by checking one of the numerous apps your company uses or by approaching coworkers for an update. With integrations, they can quickly find the needed info by accessing a tool they know best — an approach that becomes even more effective when paired with thoughtful UI/UX design for AI based products. This way everybody on your team can be aware of the latest updates without having to bother and distract their coworkers.
For example, if your team member connects Slack with their Salesforce account, they’ll instantly receive a notification to the Slack channel when an opportunity stage changes or a quote is approved. That’s how your team has the needed information in the right place, at the right time, at the right time — exactly the kind of operational clarity an AI product manager is expected to deliver.
At scale, these seamless workflows also challenge the idea of “Will AI replace SaaS” by showing that AI often strengthens SaaS products instead of replacing them.
- Increase the chance of turning prospects into paying users.
More than 90% of participants of the SaaS integration survey conducted by MuleSoft and THINKstrategies, says that integration with other systems is “important” or “extremely important” in luring new customers. This way, if your product integrates with another SaaS software that your prospects use, it gives additional reason for people to choose you over competitors. More integrations - more reasons for customers to pay for your offer.
So, integrations positively influence your business in many aspects. If you were hesitating to whether build it or not - it's definitely worth it. But here comes the difficult part. The thing is that your users don’t actually want any software integration. What they really need is the smooth and intuitive cross-product experience this integration can provide. And a step-by-step workflow that we’re going to provide you with in the next section can help you fulfill this task.
7 steps of integration design workflow
Here’s a piece of advice for you before we begin: to make the process of data integration design easier and more effective, start with the big vision - identify the overall goal you want to achieve, and then gradually break it down into smaller tasks until you get to such specifics as determining what data you want to move into each particular field.
With this recommendation in mind, let’s see what your design process may look like if we break it into a step-by-step plan.
Step 1. Define the business case
The business case articulates the primary goal and central topic of the integration project. It should provide an general overview of the integration without diving into too many tech details.
The business case is created based on the market and user research but there’s no universal format it’s supposed to have. Just make sure it describes the benefit that stakeholders would receive once they have this integration, and the competitive advantage your company would get from it.
A business case may look something like this: “By integrating our CRM system with X enterprise resource planning (ERP) software, we can improve visibility and coordination across our entire organization. This integration will enable our sales team to view real-time inventory levels and product availability, allowing them to better manage customer expectations and improve order fulfillment. At the same time, our finance team will have access to the customer order bases and other valuable data, which will help them to more accurately forecast demand and manage cash flow.”
Step 2. Describe use cases
Following our recommendation of moving from broad to narrow, the next step should be deconstructing the business case into smaller, more manageable units, or use cases.
The thing is that when you connect two systems together they usually perform more than one function, and that's what use cases should describe. In other words, they should communicate what your integration can do, not in tech but in a business-oriented manner.
As well, use cases shouldn’t depend on one another, as in the next step of the workflow, you’ll have to continue breaking them into smaller units. But don't get into too many details when writing a user story, try to keep it short and clear.
For that purpose, you can use
- Job-to-be-done framework
- User story format
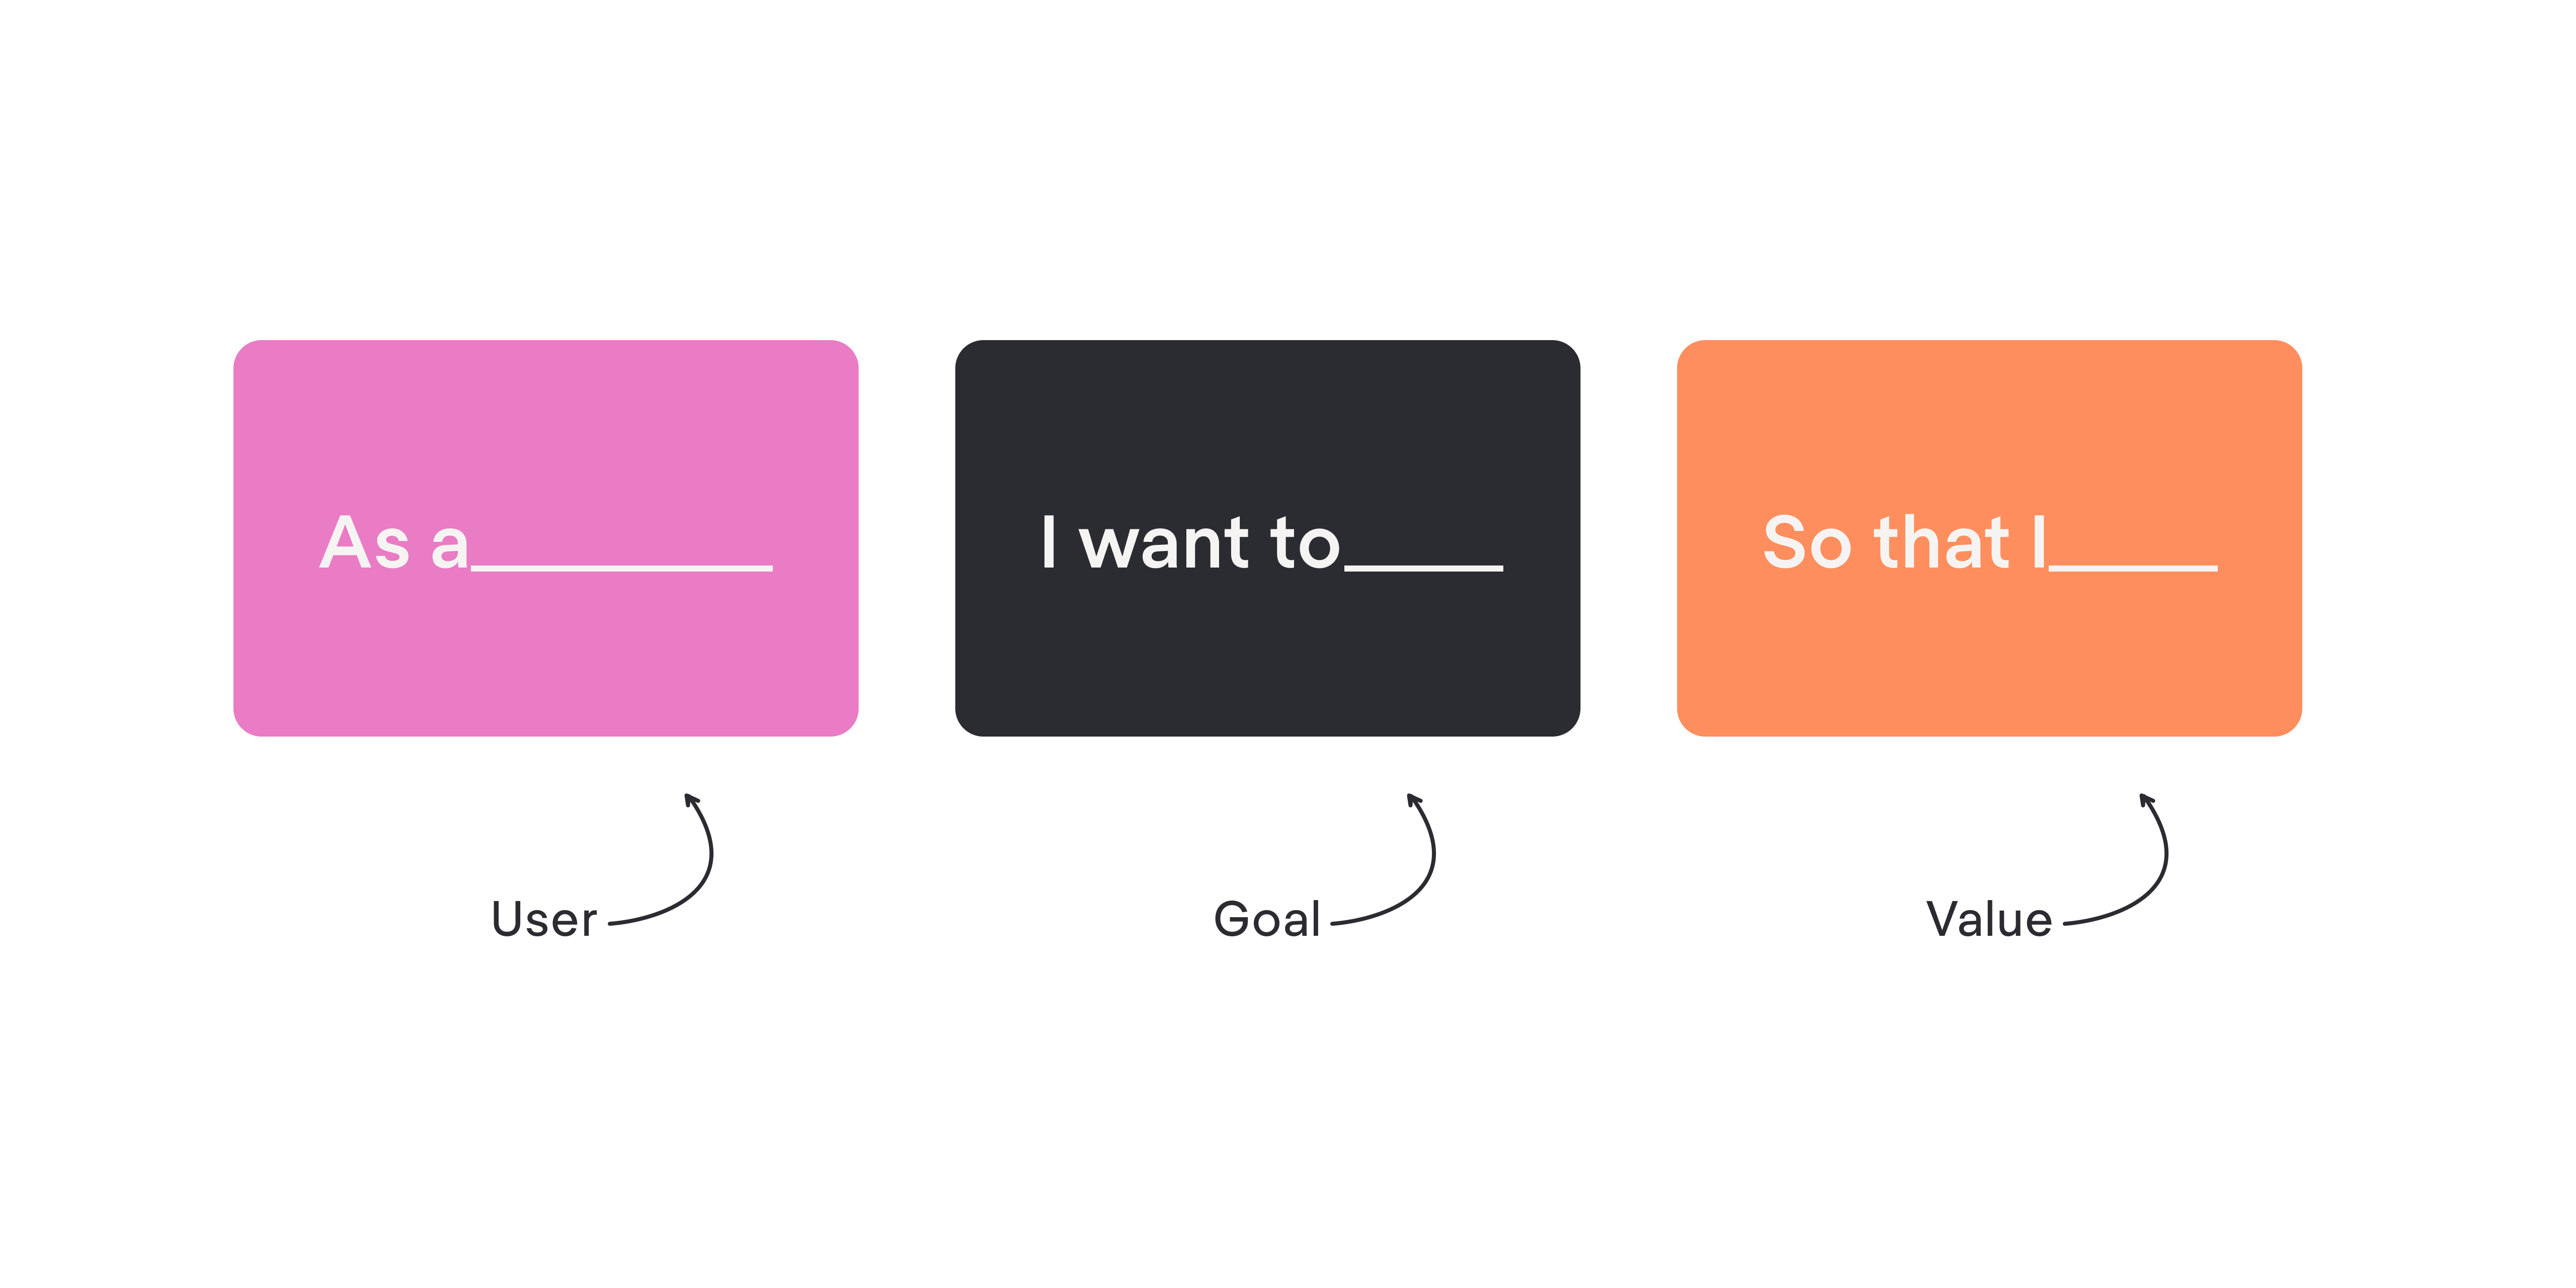
Here’s an example of a use case in a user story format: “As a chief financial officer, I want sales from a CRM to flow directly into the ERP, so that I would be able to report on actual sales data without re-entering every quote from every sales rep.”
Step 3. Define data flows
At this stage we finally move from determining the benefits integration would bring to your business and users to defining technical requirements — a step that often connects product decisions with AI in UX considerations.
A data flow describes what type of information moves from one system to another, and what it looks like at the outcome. Usually, you can define up to 3 data flows for each use case. If you end up getting more than that, the use case is too broad, which is a common risk when designing generative AI UX features without clear boundaries.
The data flow should also describe the information that moves in one direction. Defining a bidirectional one may mean you have a use case where more than one data flow is necessary to provide value to users, especially in products built around conversational UI.
So, to define a data flow you need to indicate
- The system to which the data is moving.
- The system from which the data is coming.
- The type of data that enters the target system.
- The type of data that leaves the source system in order to produce data that enters the target system.
Here’s what the data flow description may look like: Customer contact information plus purchase history from your CRM system to the ERP software.
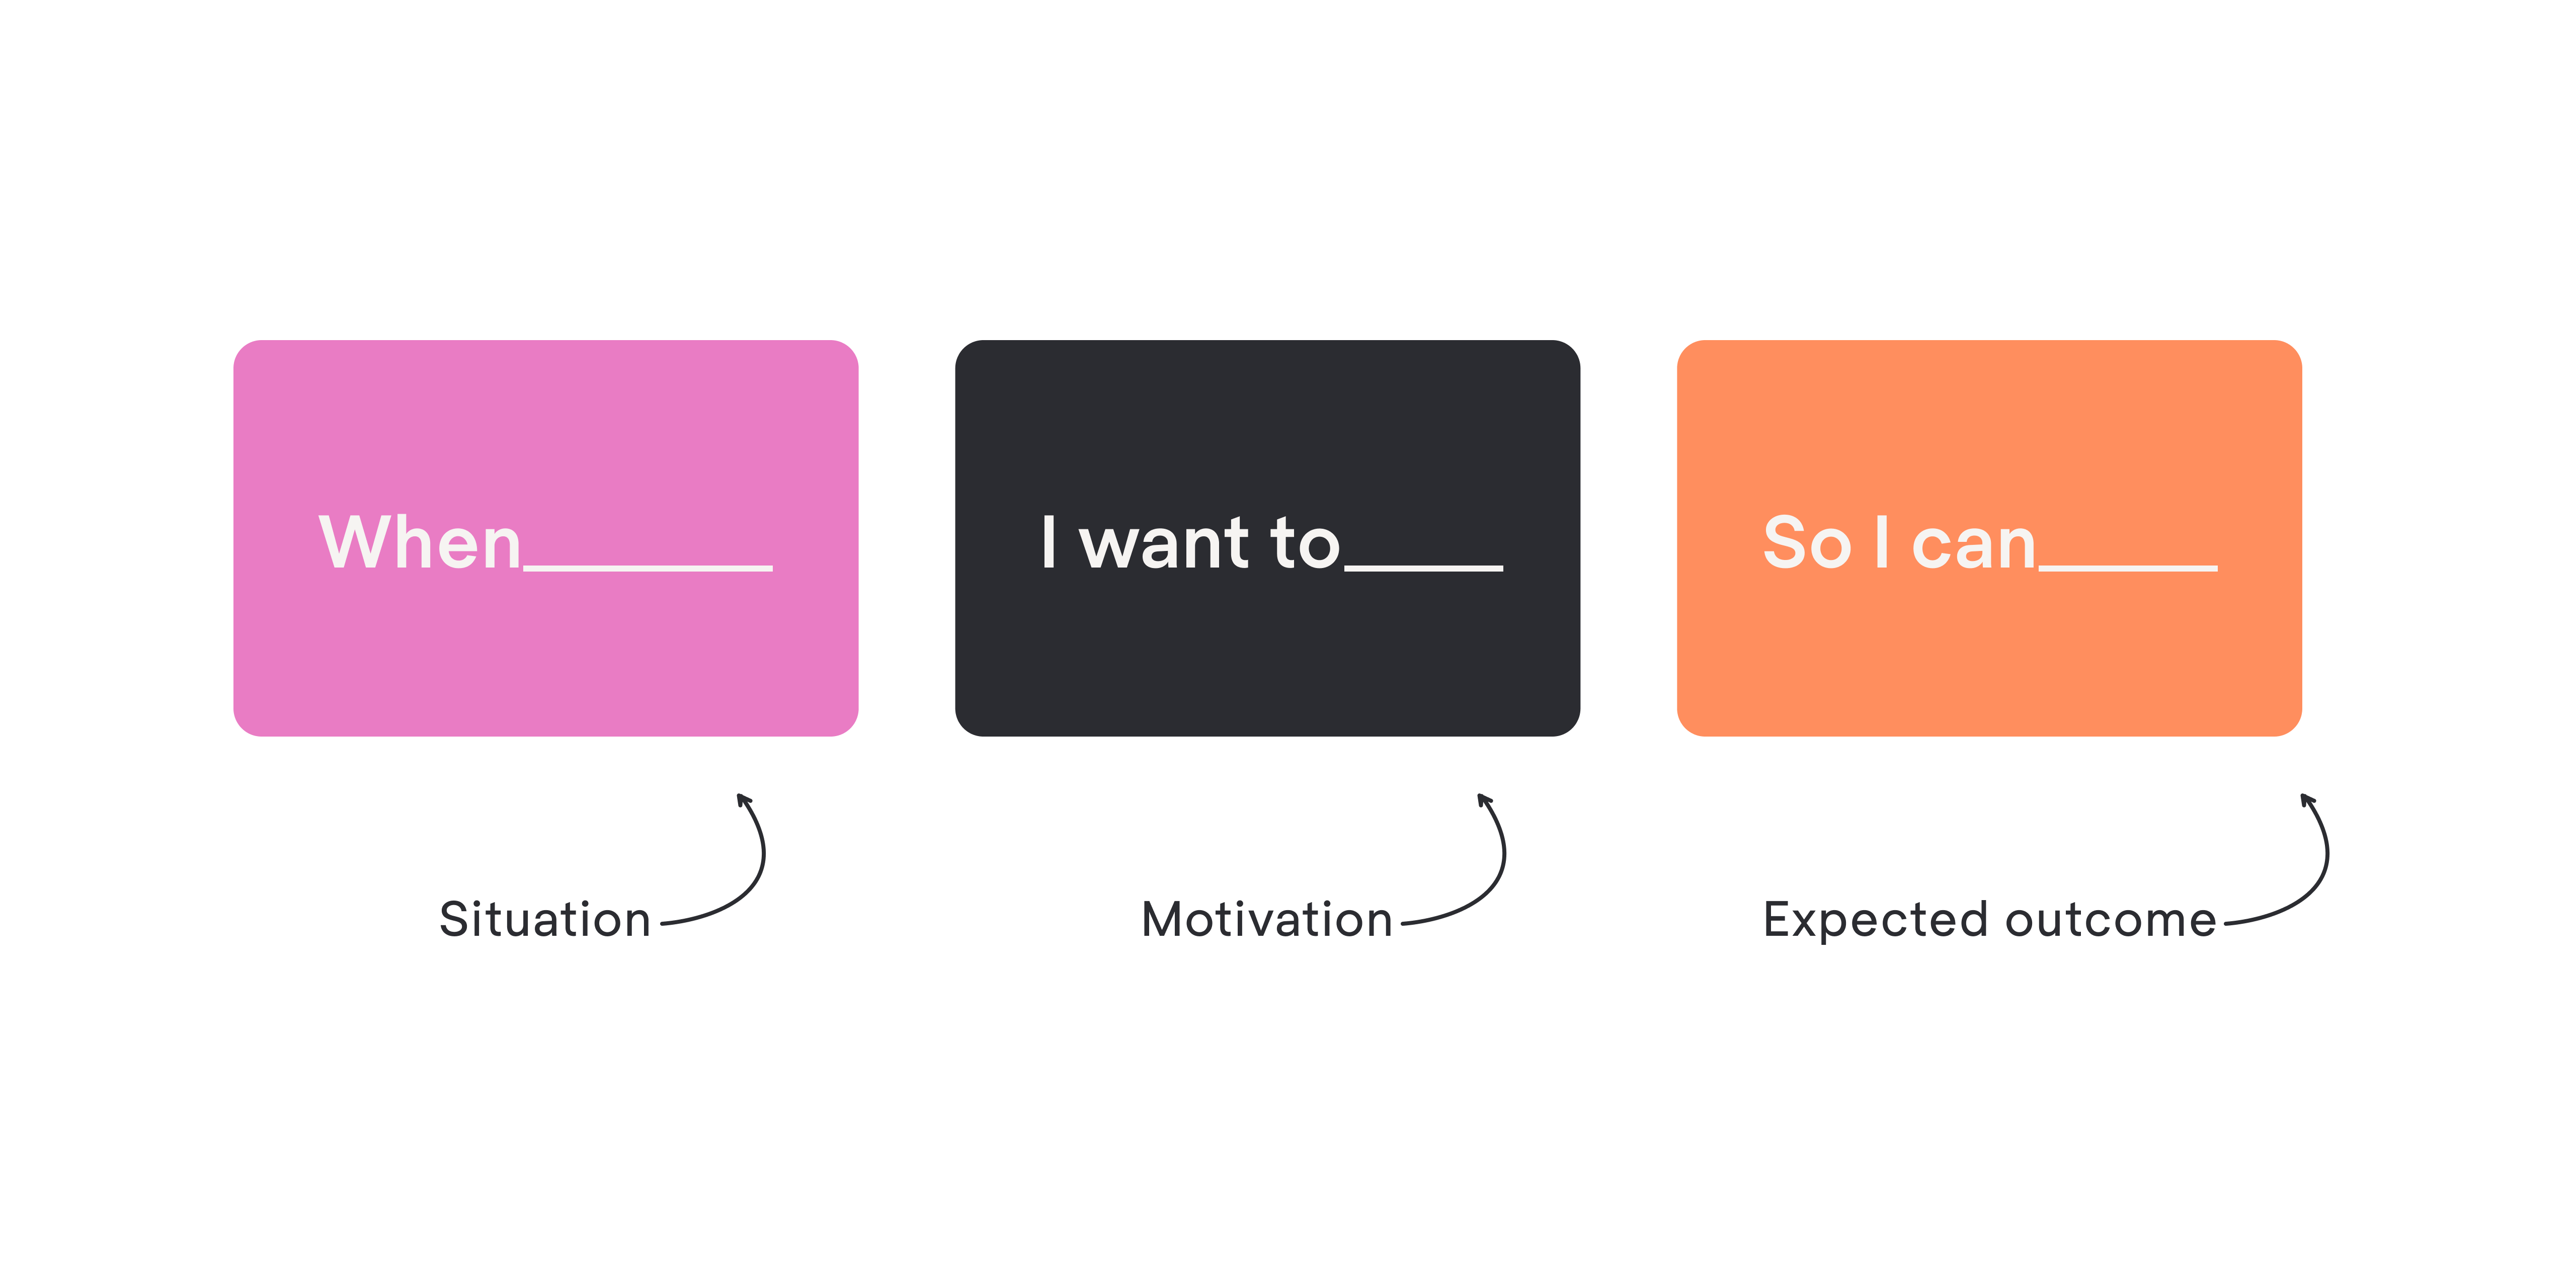
Step 4. Specify triggers
As you might have noticed in the previous section, while data flow answers the question of “what information moves from one system to another”, it doesn’t tell us when it happens. That’s the task for triggers.
Triggers state what should happen for a certain type of information to move from one system to the other.
There are several activities that can serve as triggers, such as an event happening in the source system (a user submits a form, posts a comment, or the like), meeting query criteria, placing a file in a defined location, or manually triggering a flow.
Here’s an example. “When a user submits a form in a CRM system, a webhook is triggered and sends the data to an ERP system.”
Step 5. Define outcomes
As the name implies, the outcomes specify what happens when data reaches its destination (the target system).
Naturally, there should be something that would indicate the end result of the data flow. It can be a success status response provided by API (application programming interface) or just the absence of the error message. But not all the outcomes are successful, and it’s crucial to describe both positive and negative scenarios when designing an integration.
To make your app more reliable for users, you should ensure sufficient support for unsuccessful transactions. Think about what can go wrong when the data moves from one system to the other (problems with a server, invalid data, issues with its validation, and so on), and decide how the system will react to such a problem.
Here are examples of successful and failed outcomes:
- “When the data successfully reaches the target system, the user sees a green “complete icon”.”
- “When the data fails to reach a destination, the user sees an error message and receives an email that explains the reason.”
Step 6. Map data elements that move from one system to another
In other words, this step is about field mapping.
Field mapping is the process of connecting and transforming data fields between different systems, a critical foundation for reliable AI in SaaS products. When data is transferred from one system to another, it may need to be mapped to different fields or transformed to meet the requirements of the target system.
For example, if you are integrating data between a CRM system and an ERP system, you may need to map the "customer name" field in the CRM system to the "account name" field in the ERP system — a scenario that often sits behind user-facing features like chatbot UI. Similarly, you may need to transform data formats or values to match the requirements of the target system. For instance, you may need to convert a date field from one format to another or apply a specific calculation to a numeric field.
Field mapping is crucial in data integration design because it ensures that data is correctly interpreted and utilized in the target system. Without proper field mapping, the data may not be accurately transferred, leading to errors and inconsistencies in the target system, supporting expectations uncovered through AI in UX research. Without proper field mapping, the data may not be accurately transferred, leading to errors and inconsistencies in the target system. It also helps to ensure data quality and consistency across systems, which directly affects user trust and AI transparency.
Step 7. Test the integration
To ensure the development team gets your vision right and implements everything properly, you can create test cases.
Test cases have to cover each field mapping and show how the integration will fulfill the use cases. They help to ensure that you don’t bring faulty functionality to the end user.
Identifying errors early in the design stage saves money and time compared to doing it when the technical team has already started working. Similarly to this, finding drawbacks during testing is less expensive and quicker than finding them when end users are trying to push actual data via the integration.
This was the last step in our workflow. Below you’ll find some more recommendations that would help you design integration that performs its goal and satisfies its users.
What to consider for the best integration UX
Every integration is unique. Integrations to popular platforms like HubSpot and Salesforce vary from one product to the next. Still, there are some integration design best practices that can be applied to every project and lead to better UX. Here are five of them.
- Make it easy for prospects and customers to find and learn about your integration
Integrations are a valuable addition to your product, but they won't be effective if your users and prospects aren't aware of them. To maximize the impact of your integrations, it's crucial to educate potential users and current customers in multiple ways.
For prospects, it’s best to place the information about the integration on your website to help them self-educate about your offer. To make their experience seamless, take care of making them easy to find with intuitive web navigation, ensure the content that describes the integration is consistent and that your call-to-action buttons convert prospects to users.
For existing users, make sure they’ll be able to easily find the needed integration at the right time. For example, when designing an MVP for a personal finance platform, we placed the ability to connect with the user’s pension provider as one of the onboarding steps. Users get acquainted with this opportunity right after signing up.
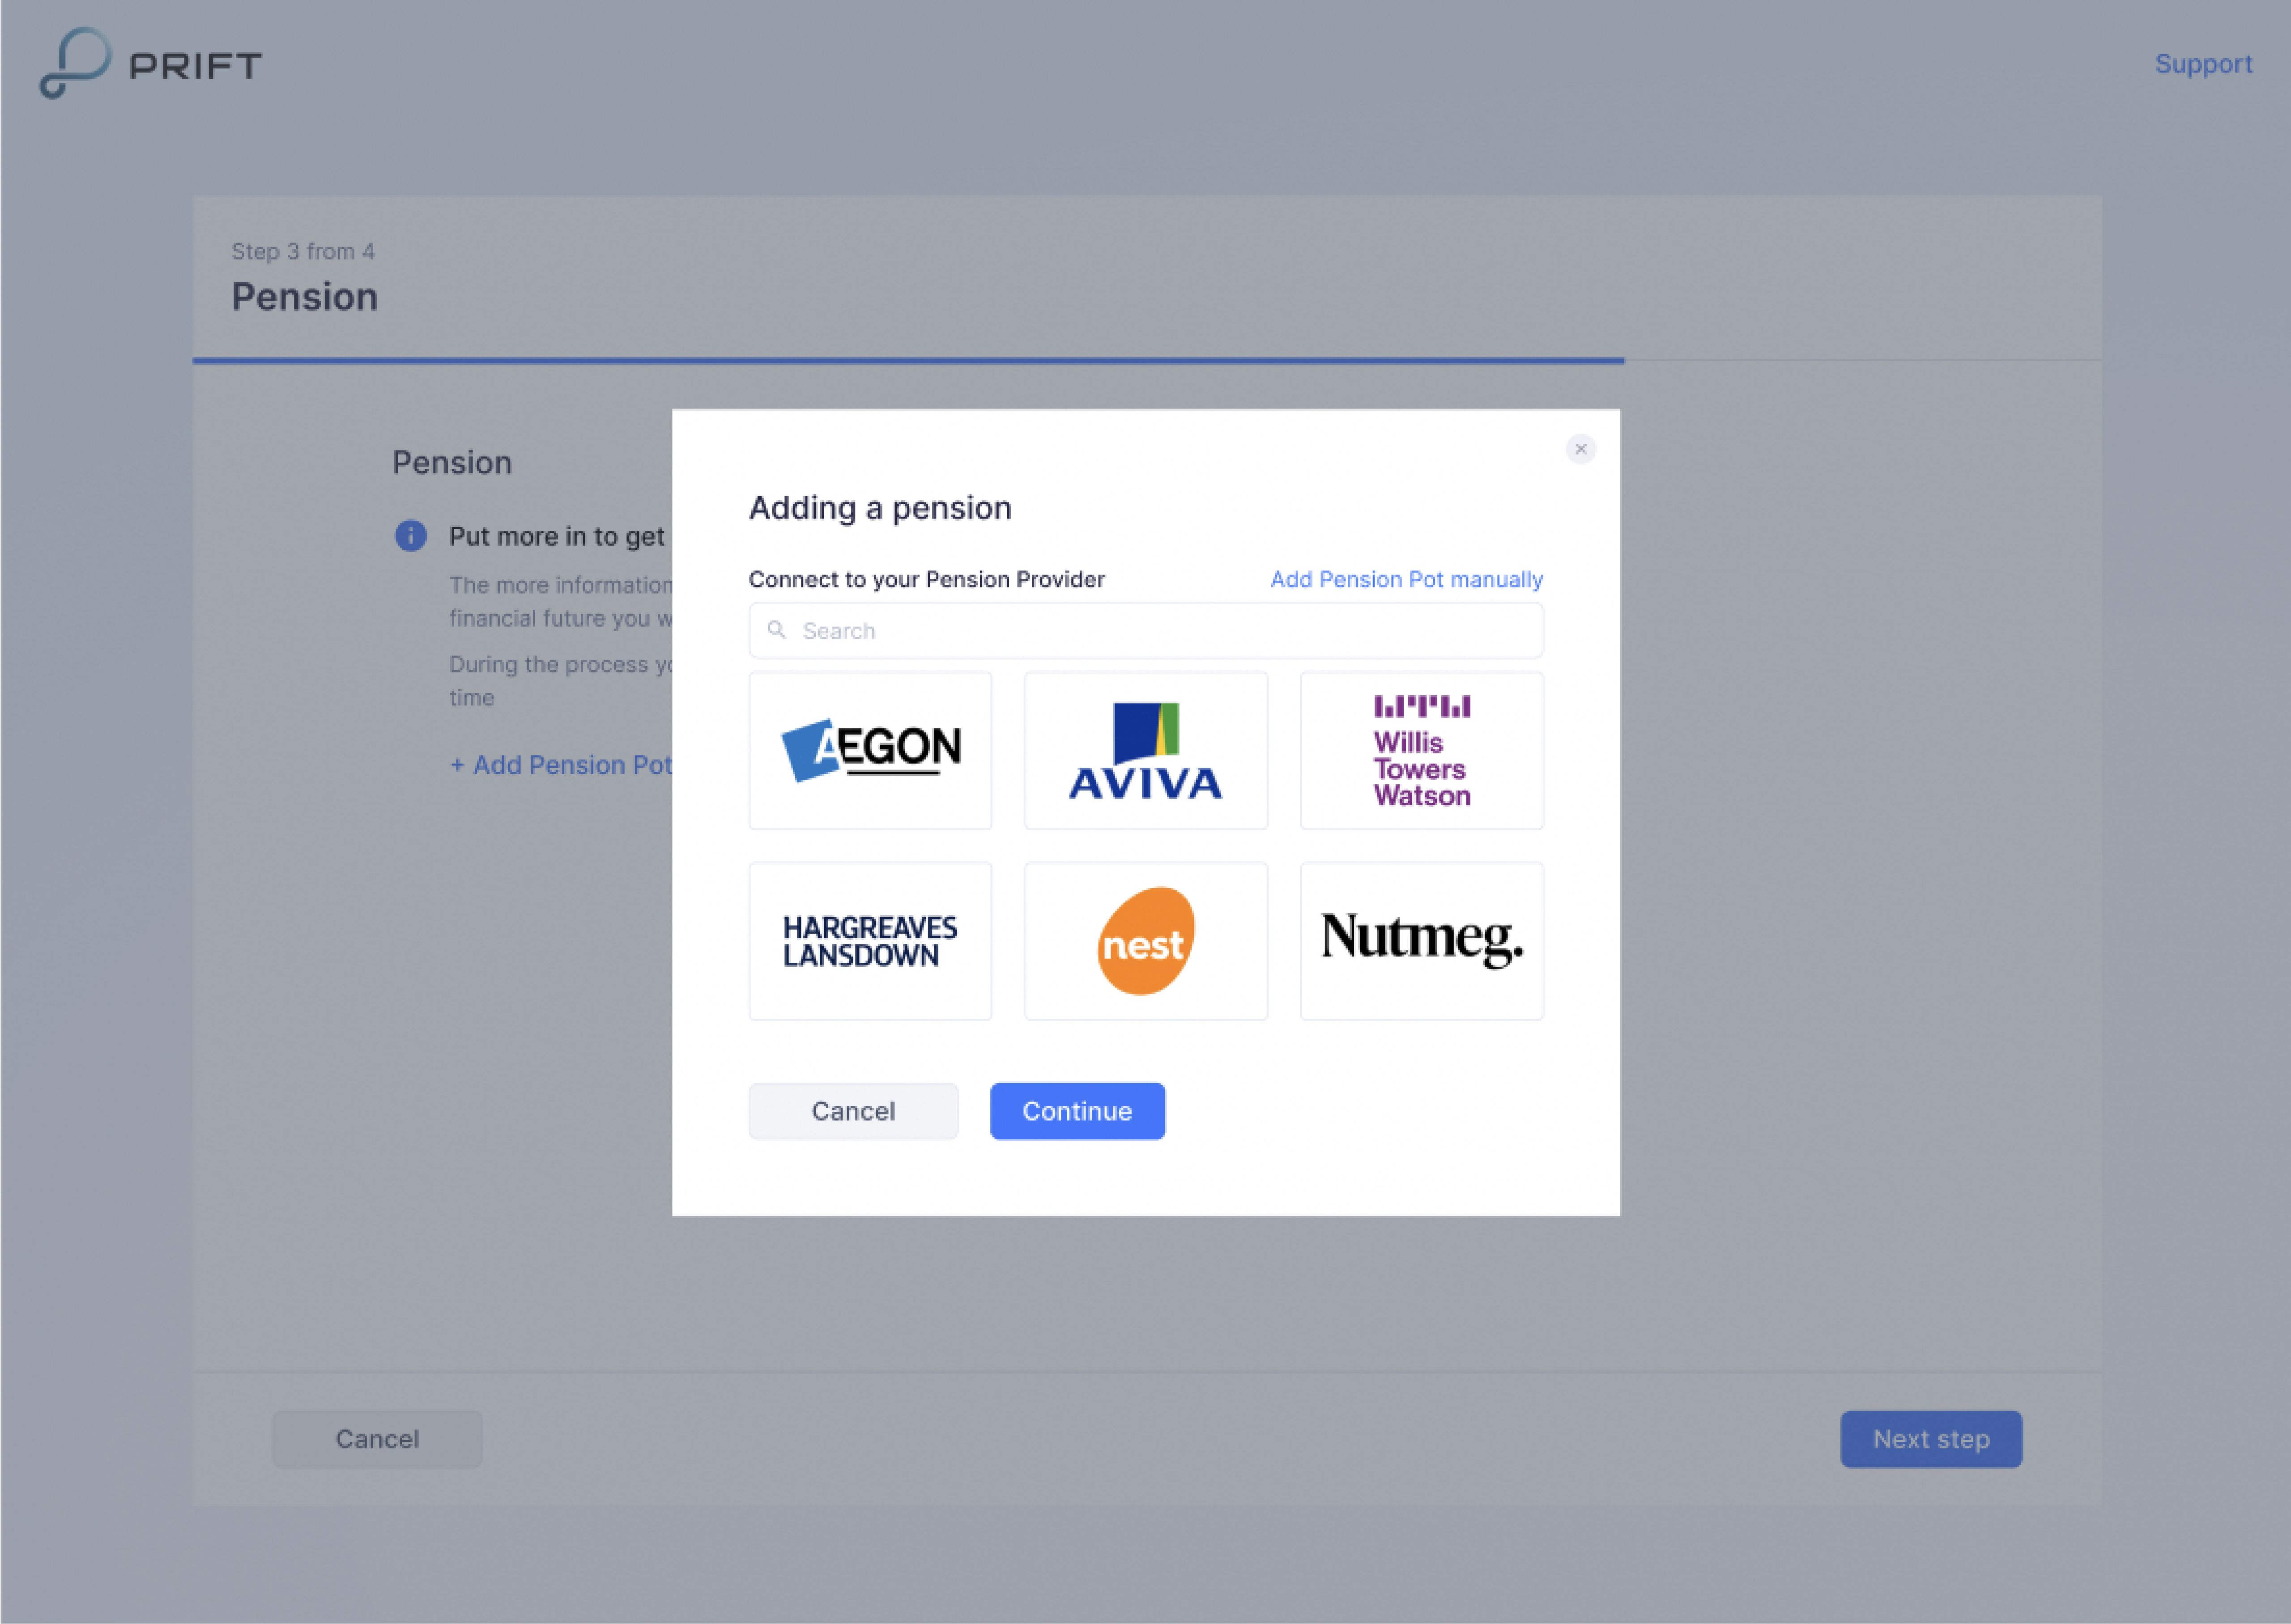
Still, if users decide to omit this step during onboarding, they can always find the integration feature in the Pension section.

- Guide the user through the setup process
Even minor obstacles can lead to user frustration and cause them to abandon the setup process. Typically, it begins with the user clicking on a call-to-action button, such as "install" or "connect," on the integration marketplace.
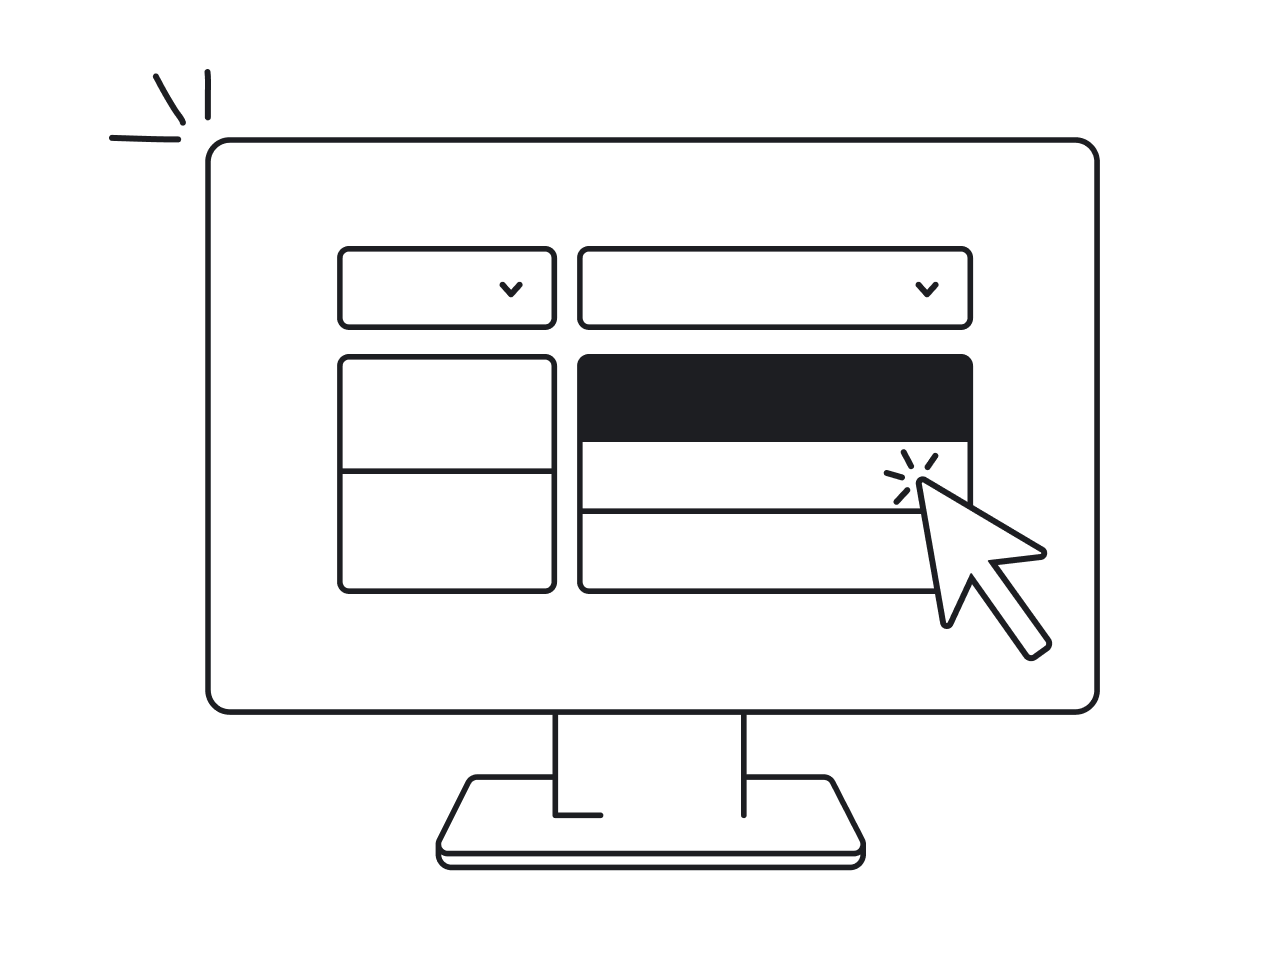
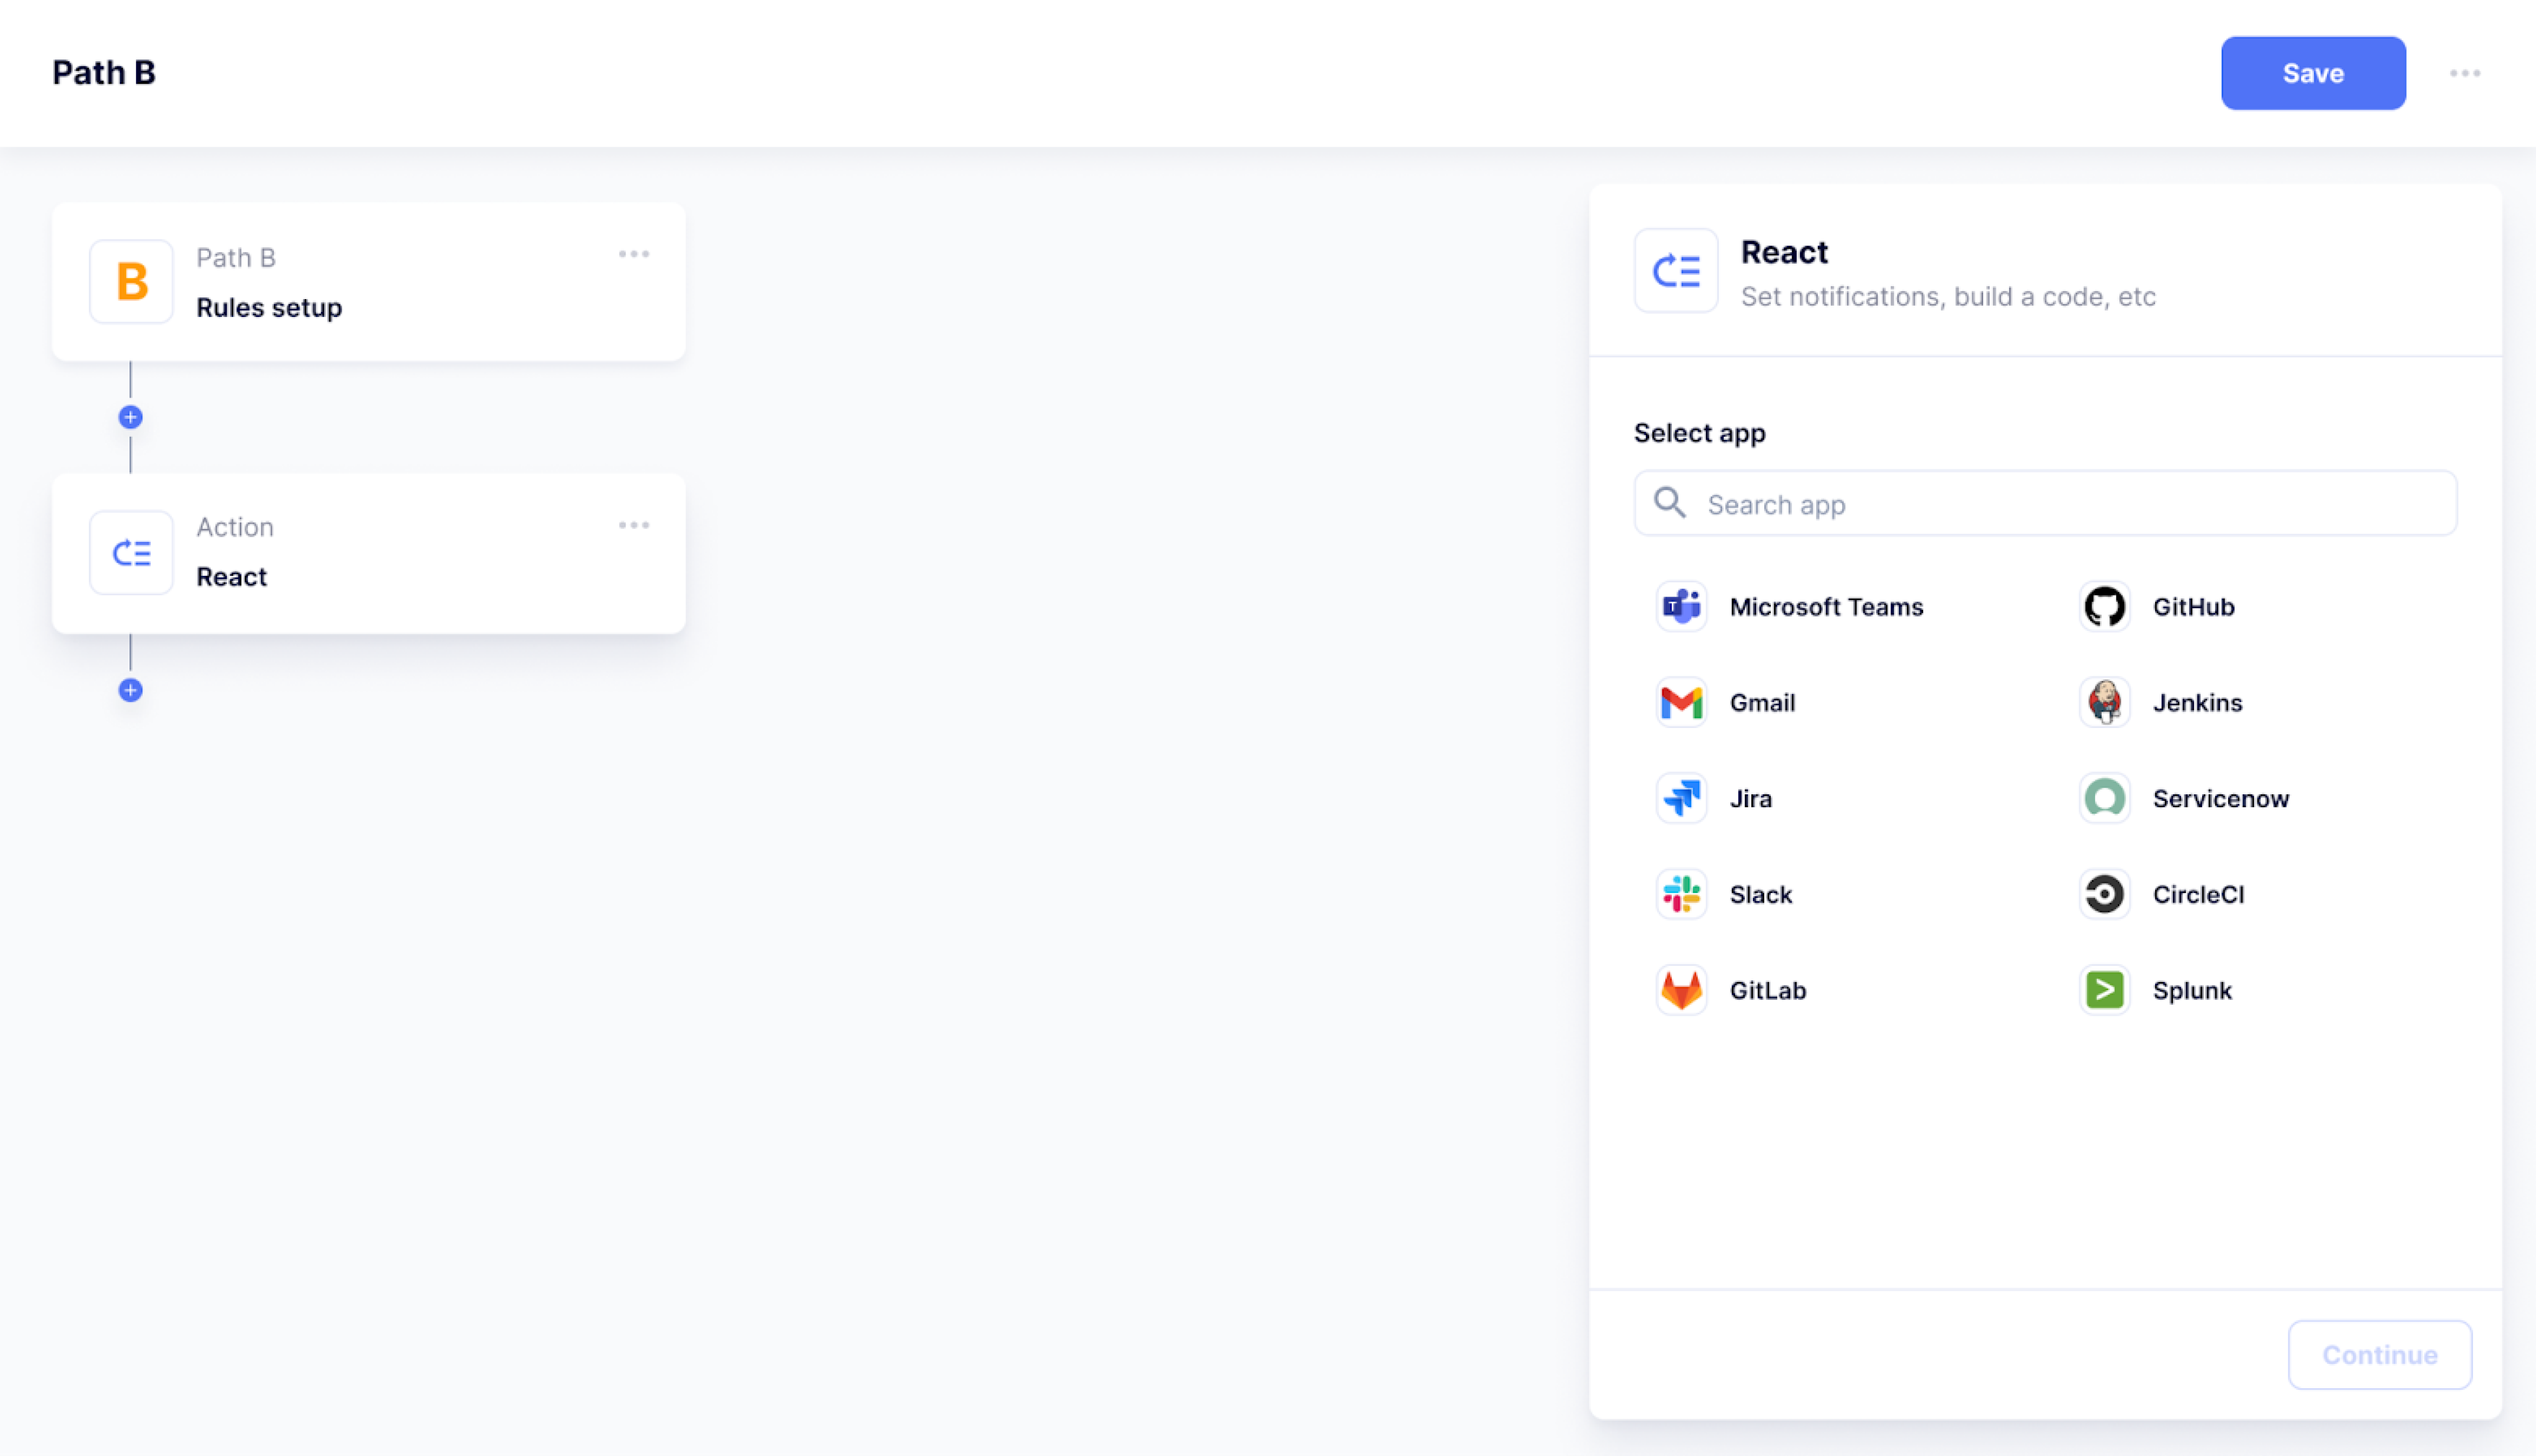
For the users that are already logged in to the system at the moment of installation, the process would be quite straightforward. A smooth setup process can be illustrated with the design we created for Tromzo, a code security app. When a user needs to set up one of many integrations, they'll see all the options on one screen, so there is no need to open the page of the app separately. It's enough to select the needed app and click the continue button.
For users that are not logged in, it's recommended to use deep links to direct users to the integration's listing on the in-app marketplace. It's also important to keep best practices in mind, such as remembering where the user left off and returning them to that exact place after they sign in and making the sign-in process as quick and easy as possible.
- Onboard your users properly
Though we always strive for simplicity, when talking about integration design simplicity is often overrated. Integrations are difficult, especially when customers are not familiar with a certain type of technology. For that reason, you should help users with onboarding.
Consider which type of support they may require in your specific case: documentation, chat support, phone support, or else. People should feel that they have access to the same level of help and that their needs are being met, regardless of whether they require assistance with integration or any other product feature.
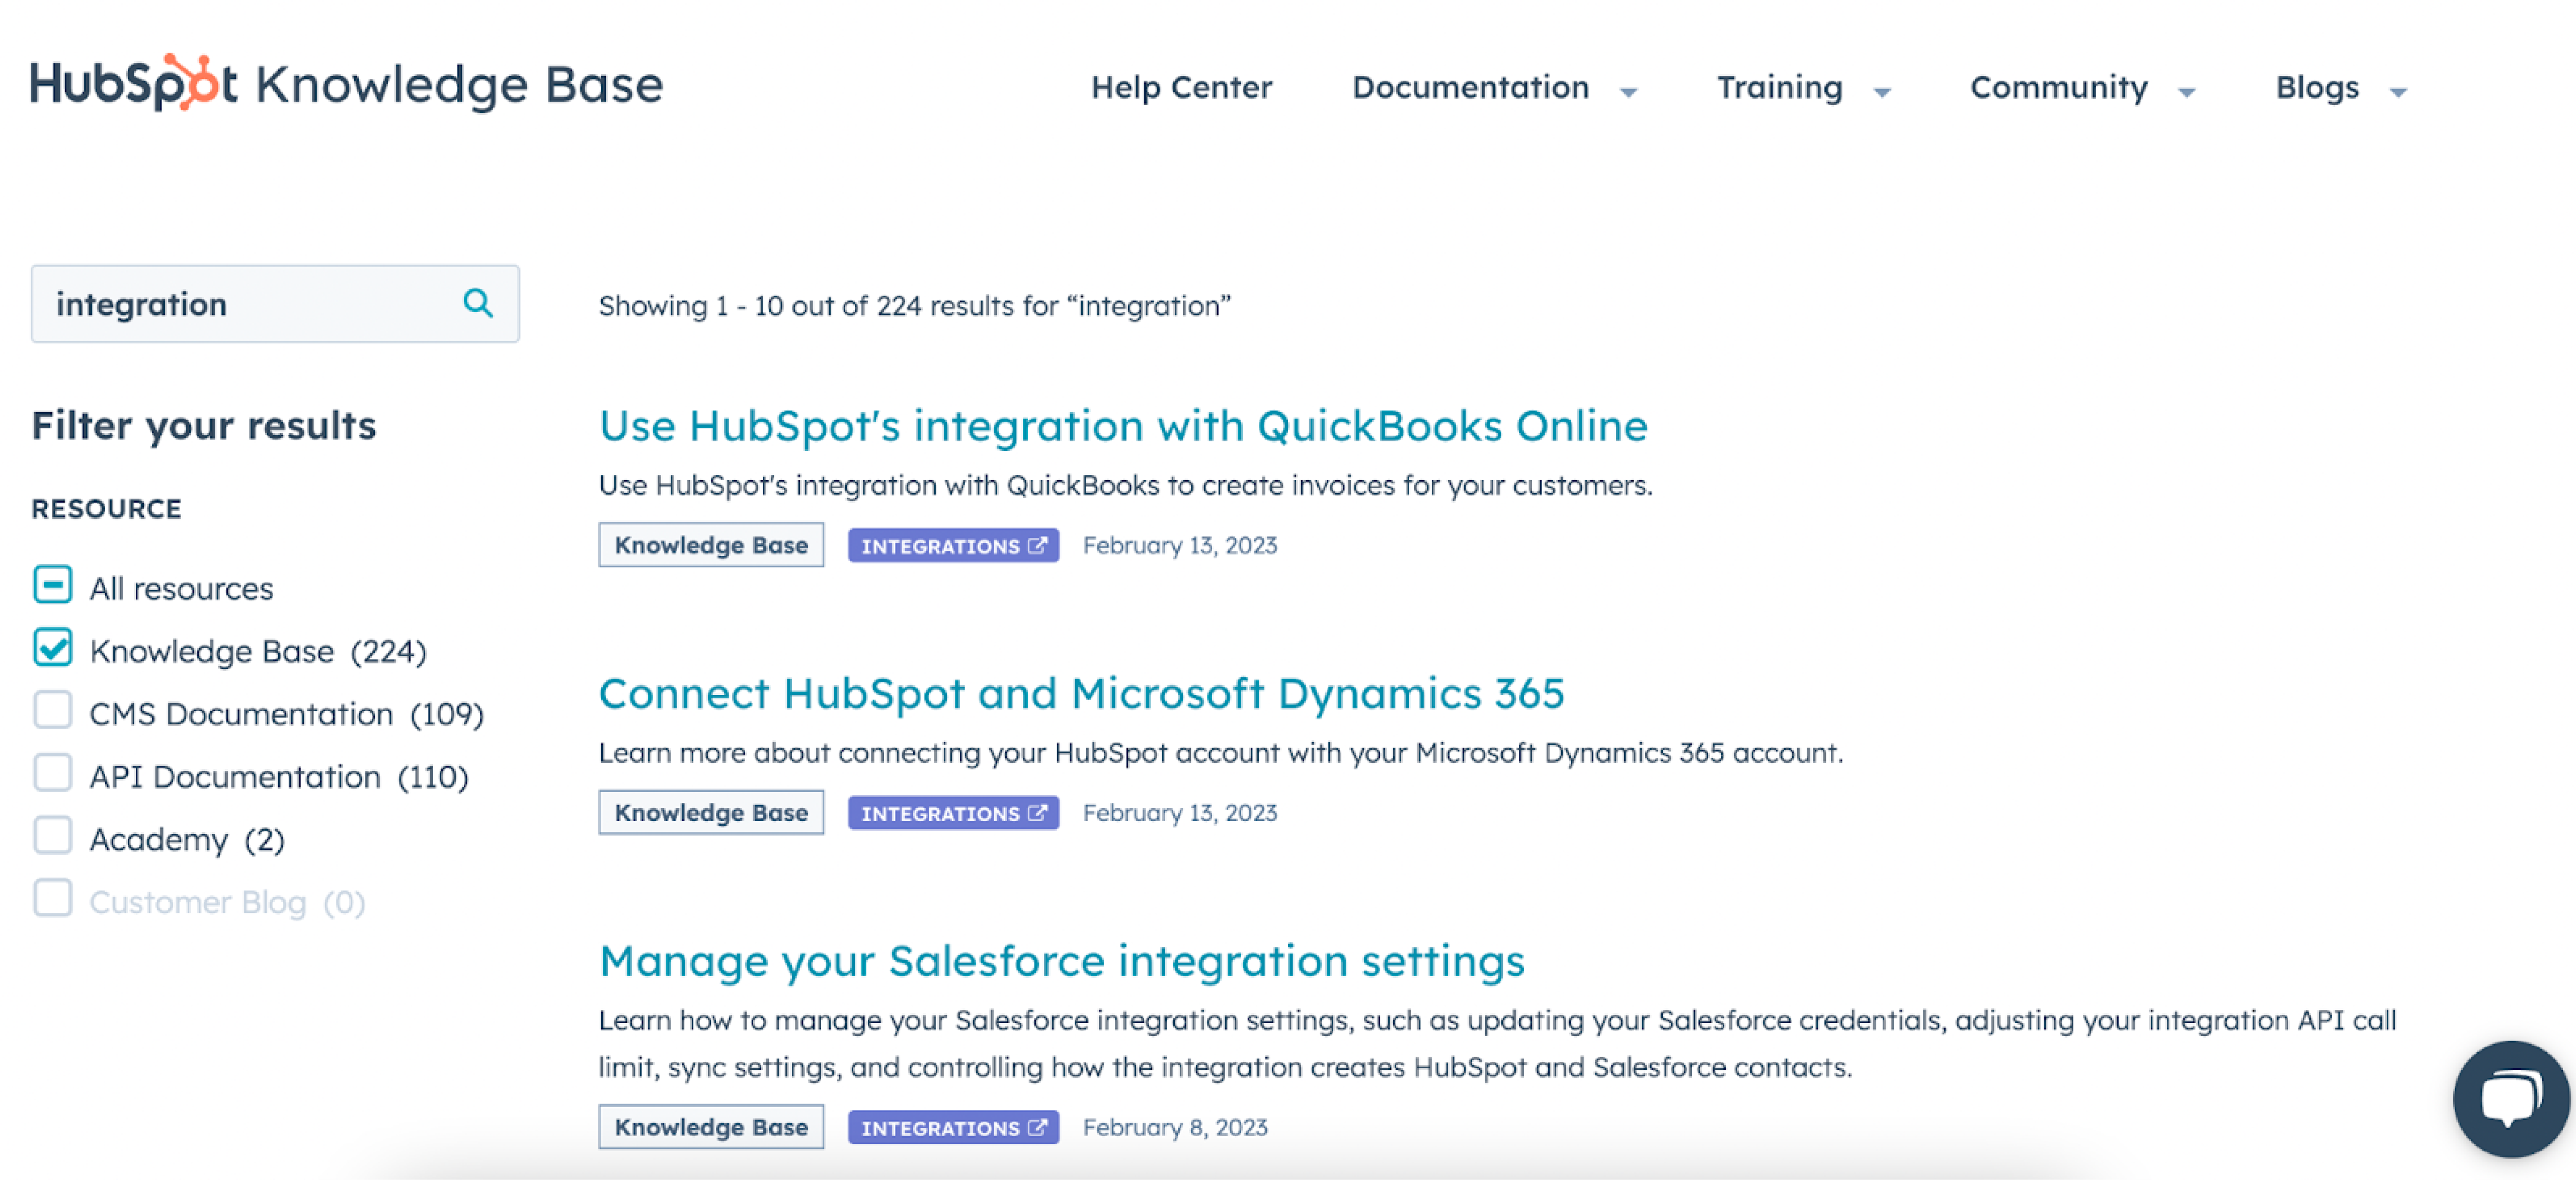
For example, HubSpot offers a wide range of training resources to help users understand how to use their integrations. There are courses such as "Getting Started with the HubSpot Salesforce Integration", "Using Zapier with HubSpot,” and so on.
- Give users control over the data flow
Users require an on/off button that would allow them to easily enable or disable the integration's functionality. To ensure a positive user experience, the button should be easy to use. Users should be able to quickly determine if the integration is currently working or not, and they should feel confident that clicking the button will give them the desired result. Additionally, displaying the data flow status once the integration is enabled will help reinforce that everything is working properly.
Salesforce provides an integration settings page where users can manage their integrations with other systems. Users can enable and disable integrations, as well as configure settings such as authentication and data mapping.
- Help users understand if the integration works well or has some failures
For simple integrations, a red/green color may be enough. However, in case the integration is complex and handles critical data, it’s better to provide more detailed information. Specific data records labeled with business identifiers (like an order number) may do well to indicate successful or unsuccessful syncing through the integration.
All in all, the process of designing an integration is rather similar to the one of creating a regular product feature. So, avoid making the mistake of believing that it’s a purely technical problem that only a developer can solve. Designing integration that would bring value to your business and to the end user requires professional UI/UX design services.
If you’re looking for a dedicated design partner with experience working with SaaS products and building integrations, contact Eleken for a free consultation.


.webp)
.png)

.png)