

Building a functional prototype used to take weeks. Now, tools like Claude Code can turn an idea into an interactive interface in hours.
But if prototyping has become so fast, why does getting from prototype to production still take so long?
A working prototype may demonstrate the main user flow, but production requires more: handling real data, edge cases, accessibility, and existing design systems. Traditionally, teams bridge this gap by rebuilding approved prototypes during development, often repeating the same decisions.
What if, instead of starting over, teams could progressively refine what they've already built?
In this article, we'll explore how to turn AI-generated prototypes into production-ready interfaces while reducing unnecessary handoffs and rework.
What actually changes between prototype and production?
A working prototype can already look and behave like a finished product, which makes the remaining work easy to underestimate. But the biggest difference isn't visual fidelity. It's how much uncertainty the interface can handle.
An AI-generated dashboard might look convincing with sample data, but what happens when a chart is empty, a request fails, or different user roles require different views?
Here's what changes as the prototype moves toward production:
The challenge isn't making the prototype look more finished. It's making sure the experience holds up outside the conditions it was designed to demonstrate.
Why “prototype first, rebuild later” creates unnecessary work
Imagine a designer uses Claude Code to prototype a new analytics dashboard. They experiment with different layouts, settle on a filtering interaction, and validate it with stakeholders. The prototype works, and everyone approves the direction.
But in a traditional workflow, that approval is only the beginning:
Prototype → Approval → Figma → Developer rebuild → Design QA → Corrections
The designer recreates the approved interaction in Figma. A developer then builds it again from those specifications. During design QA, the team discovers that the filters behave differently from the original prototype, so another round of corrections follows.
The problem isn't the handoff itself. It's that a working, validated interaction has been reduced to a reference that someone else must recreate.
With AI-assisted prototyping, there's another option:
Prototype → Refine → Validate → Working UI → Engineering review → Production
Instead of rebuilding the dashboard from scratch, the designer can refine its existing frontend, replace generated elements with approved product components, and address missing states. Engineering then reviews what can be reused, makes the necessary technical changes, and integrates it into the product.
Not every line of prototype code will survive. But the team has a chance to preserve the decisions and implementation work that are already sound.
The real efficiency gain comes from reducing how often the same solution has to be designed, interpreted, and built again.
Prototype to production workflow: 7 steps you need to follow
A working prototype helps you test an idea, but taking it to production requires more than a convincing demo. These seven steps walk you through the process, from exploring early concepts to refining the interface and handing it over to engineering for integration and release.
Step 1. Start with a rough working prototype
Once you've identified the product problem, resist the temptation to jump straight into a polished solution. The first prototype should help you explore what's possible, not lock you into the first idea that looks convincing.
AI tools like Claude and Claude Code make this exploration faster, allowing designers to compare different approaches before committing to implementation.
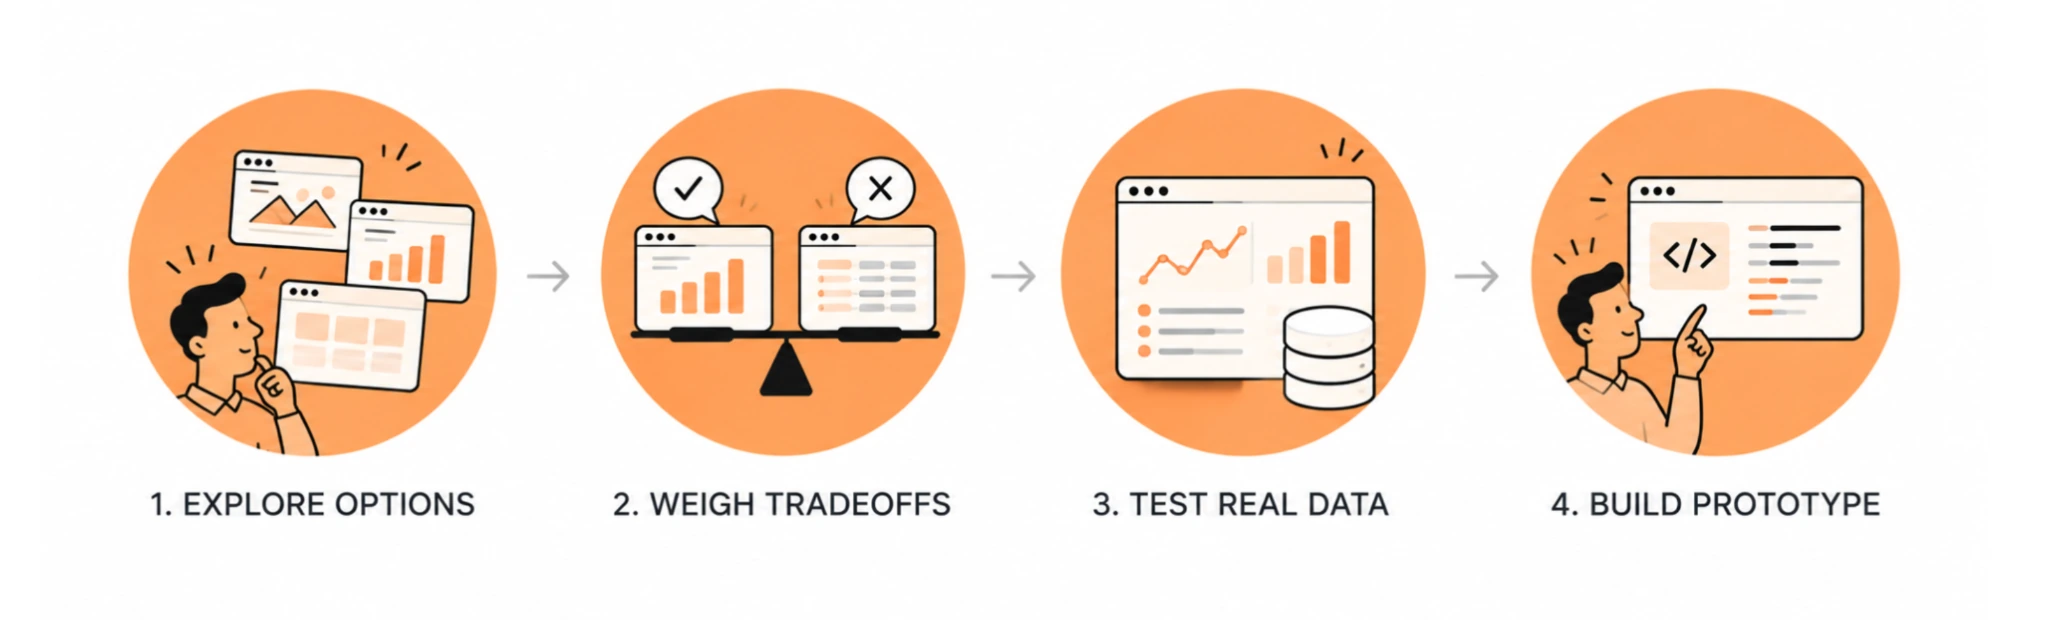
Here's how to approach it:
- Generate several directions. Brainstorm alternative layouts, navigation structures, or interaction models instead of refining the first idea.
- Compare the tradeoffs. Evaluate the pros, cons, and user implications of each approach to understand which one best addresses the problem.
- Use realistic content. Test concepts with plausible data, labels, and scenarios rather than placeholders that might hide design problems.
- Choose a direction worth developing. Combine promising ideas where appropriate, then use Claude Code to turn the selected approach into a working prototype.
For example, when designing an analytics dashboard, you might explore different ways to display data: using charts, tables, or a mix of both. Then compare which option makes information easiest for users to understand.
Here, the key is to explore alternatives when the solution isn't obvious, weigh their tradeoffs and implications for users, and only then bring the selected direction into Claude Code for implementation.
Step 2. Turn the generated prototype into an intentional product experience
AI can generate a convincing interface without understanding why each element belongs there. The result might look polished but contain confusing navigation, redundant controls, or inconsistent interactions.
This is where the designer desloppifies the prototype: identifies what AI got wrong and refines the experience based on how people will actually use it.
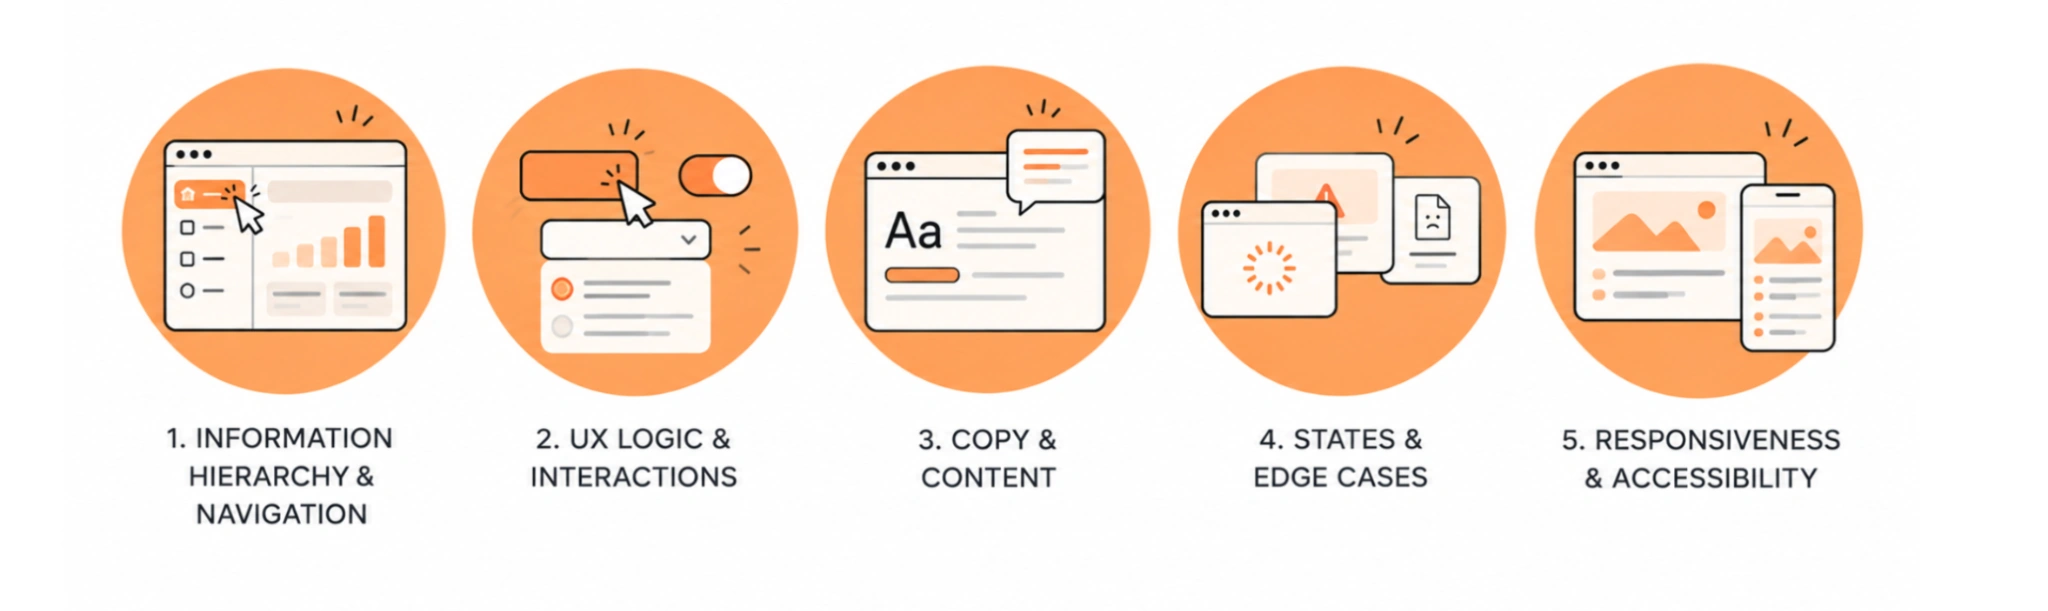
Focus on five areas:
- Information hierarchy and navigation. Make sure users can find what matters and move through the interface without unnecessary friction.
- UX logic and interactions. Check whether actions behave predictably, flows make sense, and controls support real user tasks.
- Copy and content. Replace generic labels and placeholders with realistic language and data that reflect the product.
- States and edge cases. Account for loading, empty results, errors, permissions, and unexpected user actions.
- Responsiveness and accessibility. Ensure the interface works across screen sizes and supports accessible interaction patterns.
For example, an AI-generated analytics dashboard might display attractive charts but offer no clear way to compare reporting periods. The designer identifies that gap, decides how comparison should work, and uses AI to implement and test the interaction.
Figma and code don't have to be competing approaches. Designers can use Figma when it's easier to refine visual details or when a team needs Figma files for collaboration and documentation. Meanwhile, they can continue building and testing the interactive prototype in code. The workflow can use both tools wherever each is most useful.
AI makes it cheaper to explore alternatives. The designer decides which solution deserves to become part of the product.
Step 3. Ground the prototype in the real design system
A prototype can work well on its own and still feel out of place in the actual product. To prevent this, the designer needs to ground the prototype in the product's existing design system rather than let AI invent new UI elements with every prompt.
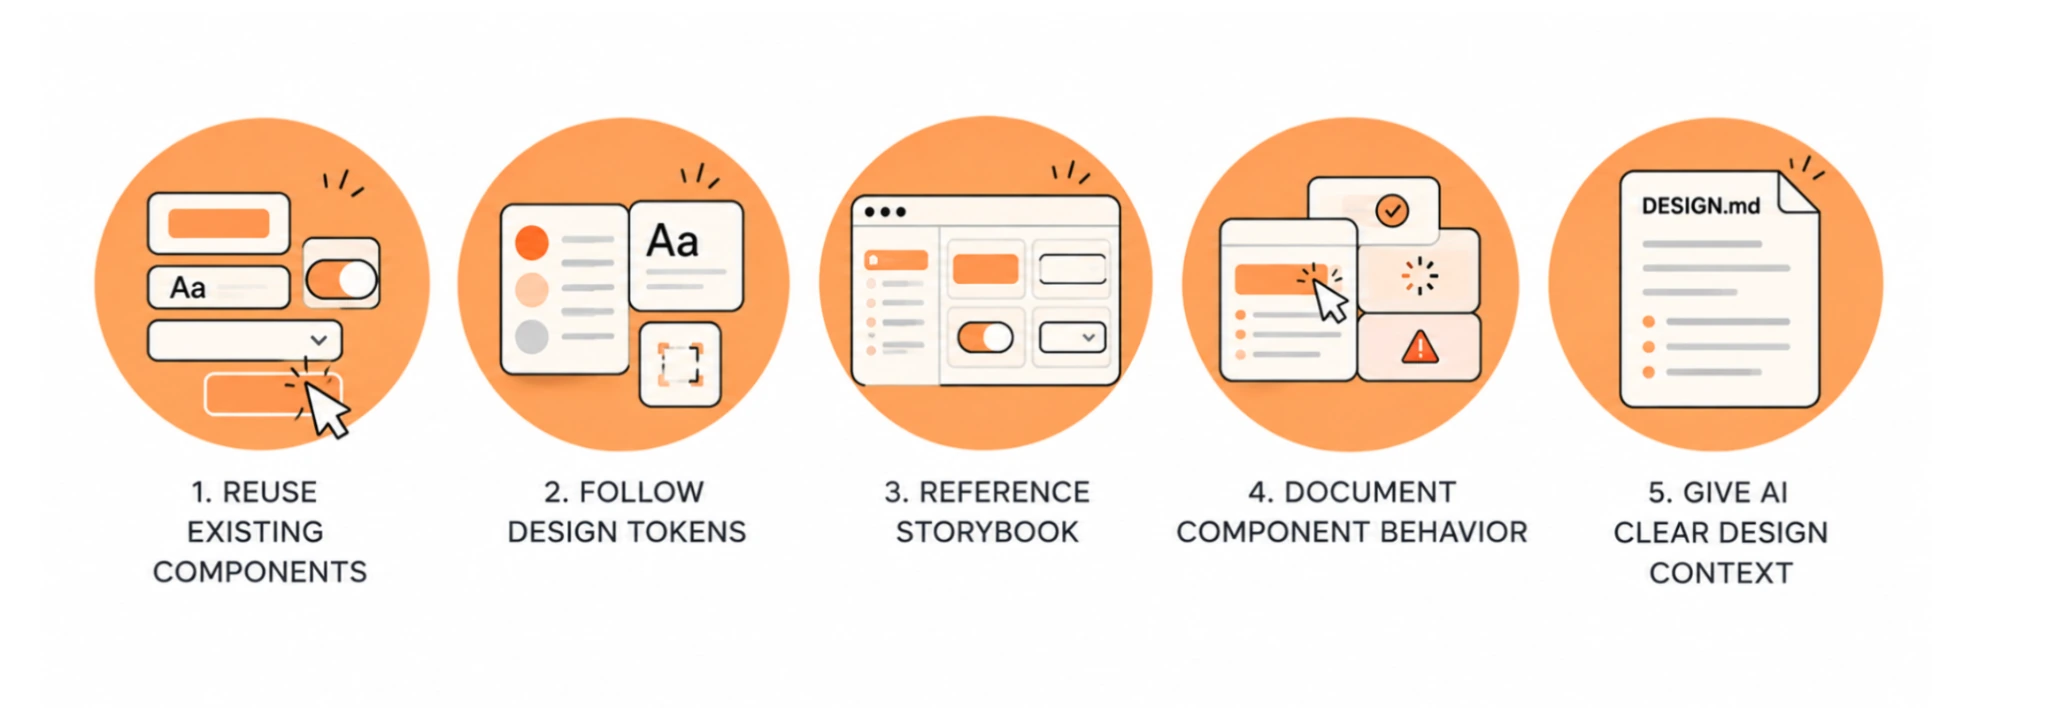
Here's what helps maintain consistency:
- Reuse existing components. Ask Claude Code to work with the product's existing buttons, inputs, tables, and navigation components instead of generating new ones.
- Follow design tokens. Use established colors, typography, spacing, and other shared values instead of introducing styles that don't match the existing design system.
- Reference Storybook. Use it to inspect available components and their states, so the prototype reflects what already exists in code.
- Document component behavior. Specify how components should respond to interactions, validation, and different states—not just how they should look.
- Give AI clear design context. Use a DESIGN.md file or equivalent documentation to explain component conventions, reusable patterns, and rules AI should follow.
For example, when building an analytics dashboard, Claude Code might generate a custom date picker even though the product already has one. Reusing the existing component keeps the interface consistent and avoids creating another version that engineers will have to maintain.
The goal isn't simply to make the prototype look consistent. It's to build with the same components and rules the real product already uses.
Step 4. Test the real interface, not just the happy path
A prototype might work perfectly with sample data and predictable user actions. But real users encounter empty screens, failed requests, unexpected inputs, and situations the original design never accounted for.
To move toward production-ready UI, you need to test how the interface behaves when conditions change.
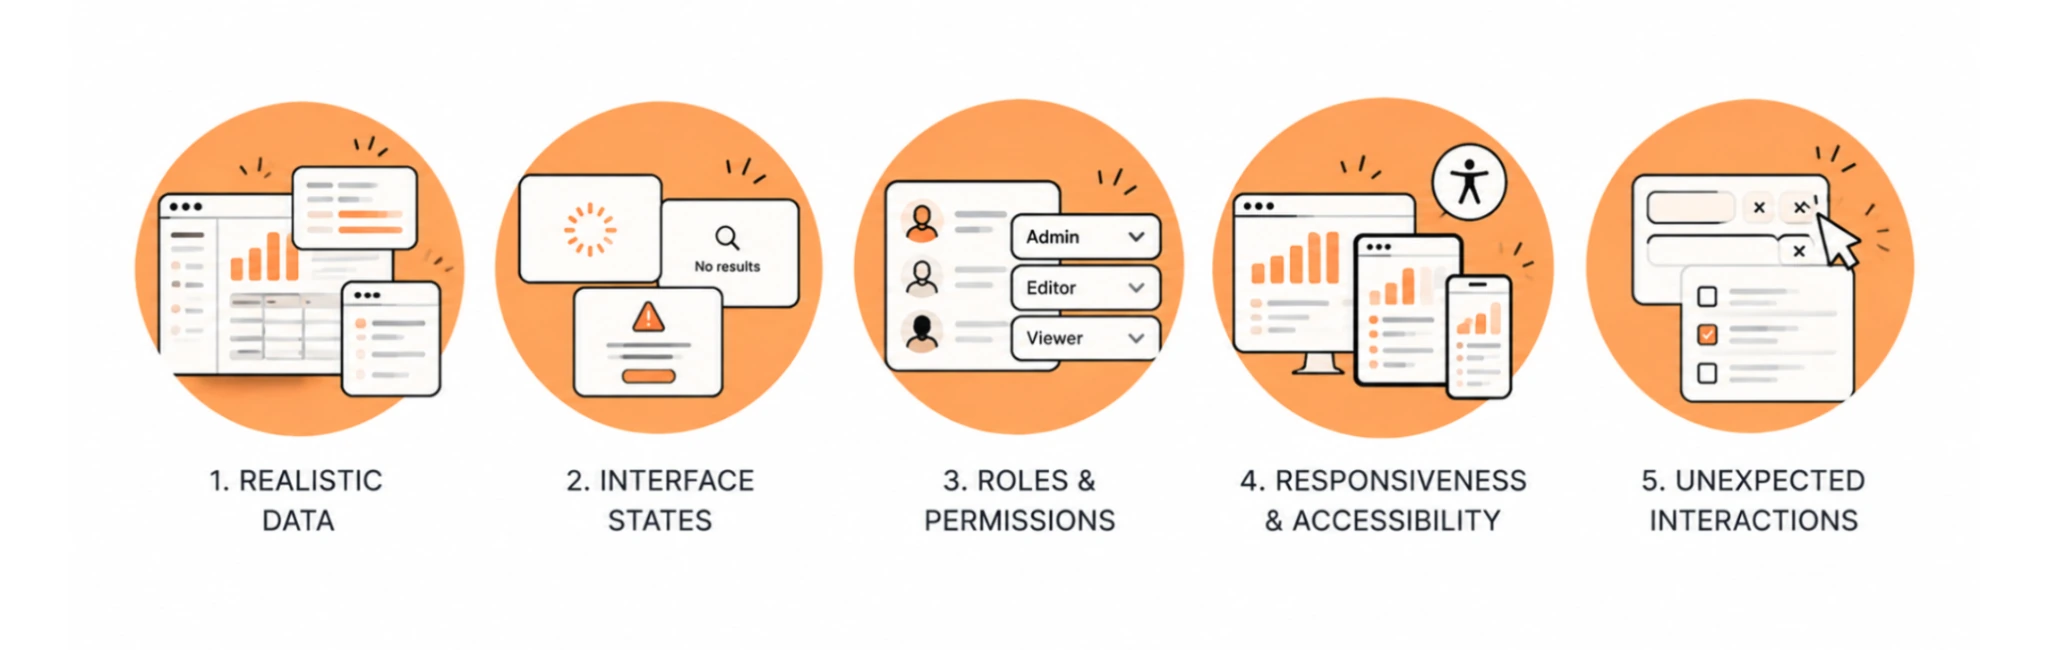
Focus on five areas:
- Realistic data. Test with actual or representative content, including long labels, short values, missing information, and large datasets.
- Interface states. Check loading, empty, error, and disabled states. Make sure users understand what's happening and what they can do next.
- Roles and permissions. Verify how the interface behaves for users with different access levels.
- Responsiveness and accessibility. Test across screen sizes, responsive breakpoints, keyboard navigation, and focus states.
- Unexpected interactions. Try clearing filters, interrupting actions, switching views quickly, and moving between different interface states.
For example, an analytics dashboard might display charts correctly with sample data but fail when a report contains no results. Does it explain why the chart is empty? Can users adjust their filters to try again?
The point of testing isn't to confirm that the prototype works. It's to discover where it stops working—and resolve those gaps before they reach production.
Step 5. Put the prototype somewhere stakeholders can actually use it
Testing the interface yourself is one thing. Getting meaningful feedback from others is another. A prototype running on your computer isn't particularly useful to stakeholders who can't interact with it.
The solution is to make the working interface accessible for review.
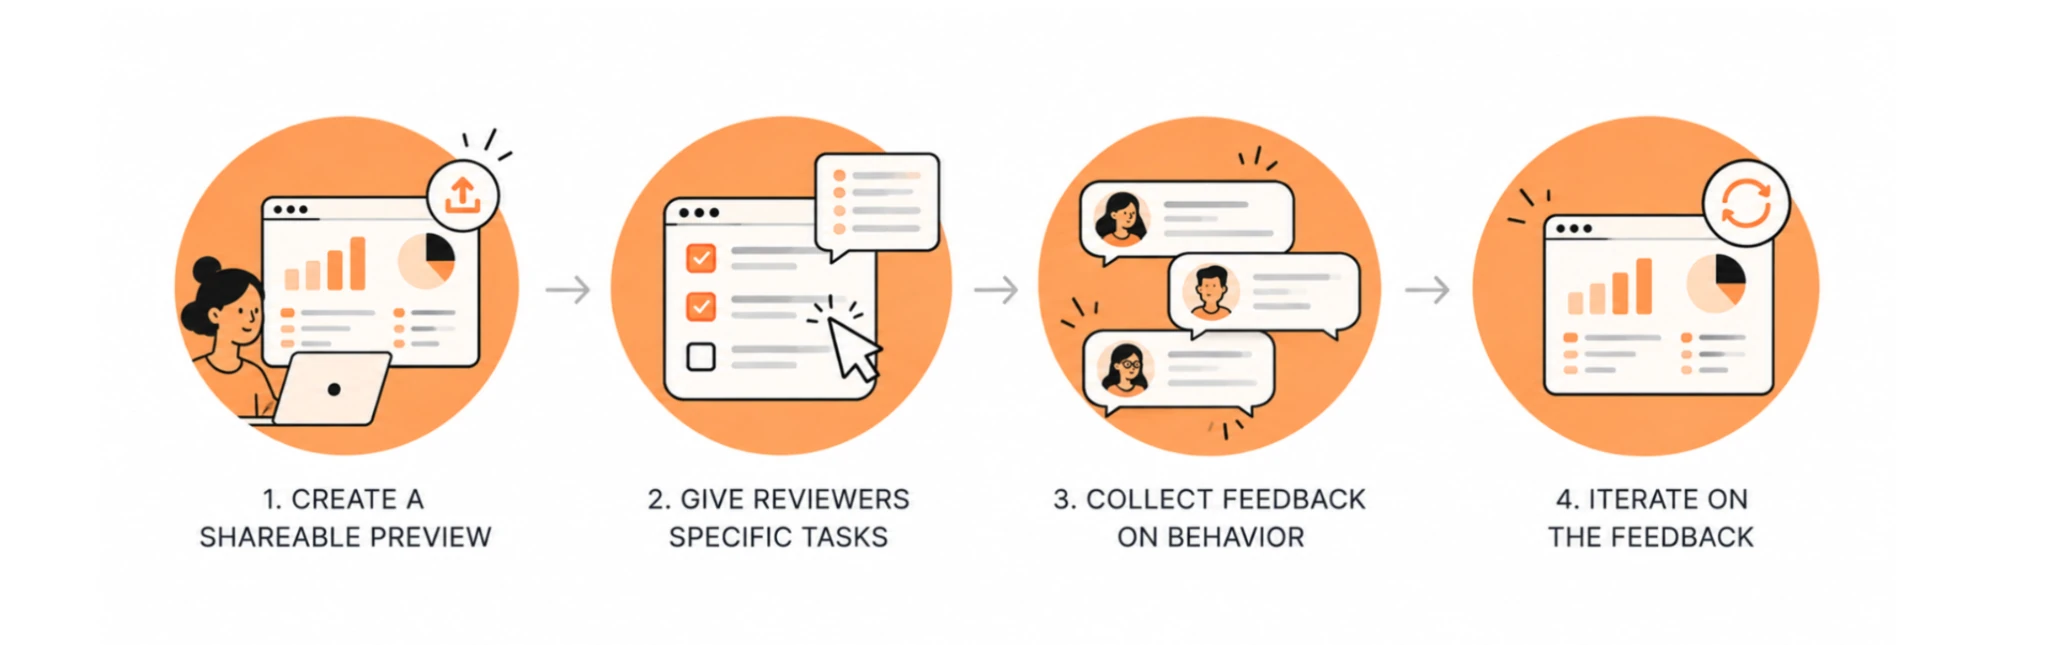
Here's how:
- Create a shareable preview. Use platforms like Vercel or Netlify to publish the prototype, or share a preview environment connected to your development branch.
- Give reviewers specific tasks. Instead of asking whether the design looks good, ask them to complete realistic actions and identify anything confusing.
- Collect feedback on behavior. Encourage reviewers to test navigation, interactions, and workflows rather than commenting only on screenshots.
- Iterate on the feedback. Use Claude Code to implement changes, test them locally, and share an updated version for review.
For example, stakeholders evaluating an analytics dashboard could try comparing two reporting periods or finding a specific metric. Their feedback might reveal confusing interactions that weren't obvious during the designer's own testing.
In Eleken's workflow, designers share working React or HTML iterations every one to three days, allowing feedback to shape the interface while changes are still relatively inexpensive.
The goal is to get approval based on how the product actually works, not how stakeholders imagine it will work from static screens.
Step 6. Turn the approved interface into a review-ready pull request
Once stakeholders approve the working interface, the next task is to prepare it for engineering review. Instead of handing over static designs, you can deliver the implemented frontend through the product's existing development workflow.
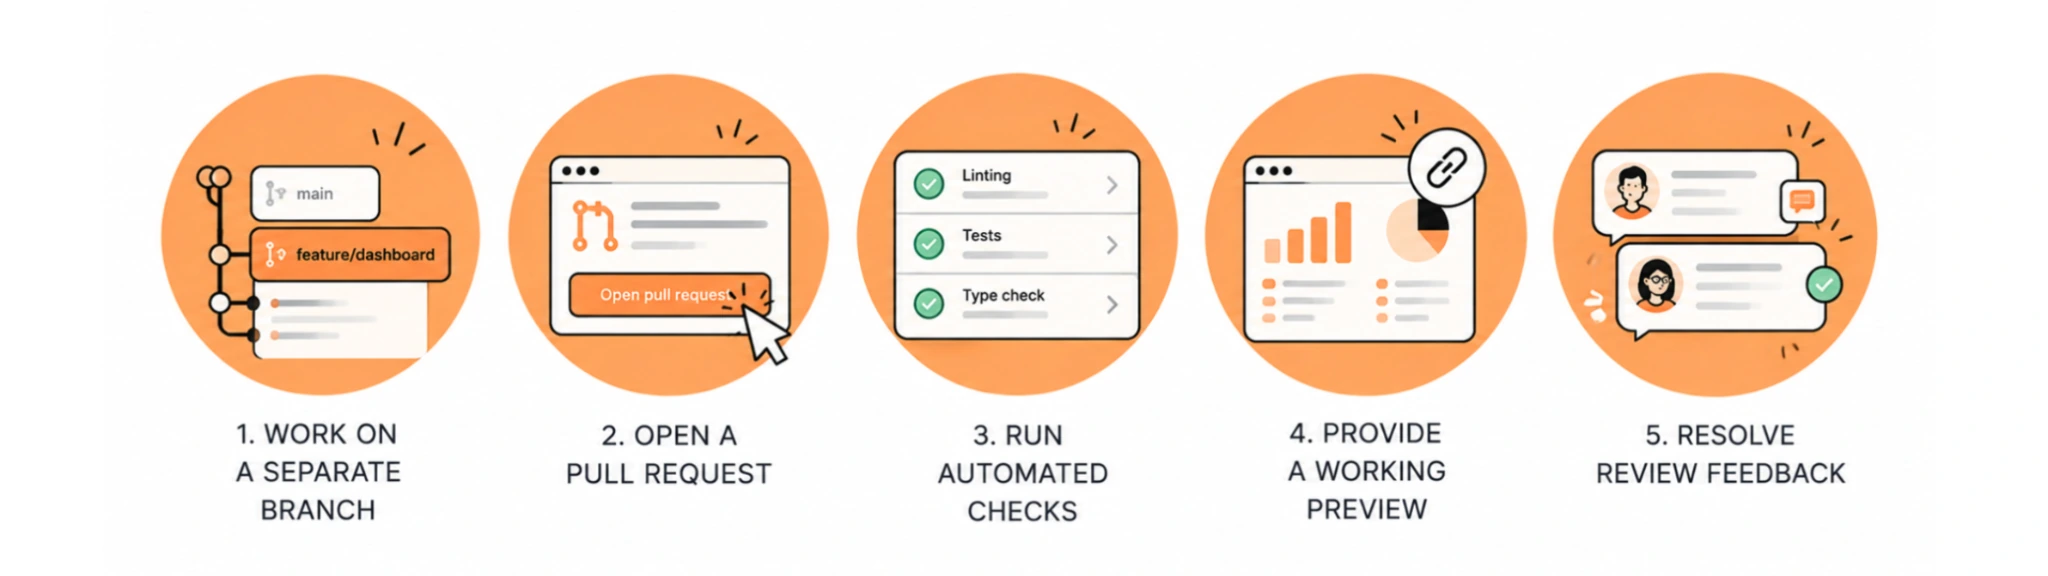
Here's how to approach prototype to code:
- Work on a separate branch. Keep your changes isolated from the main codebase so they can be reviewed without affecting the existing product.
- Open a pull request. Use Claude Code to commit the changes and create a PR with a clear summary of what's been implemented.
- Run automated checks. Make sure the changes pass the project's configured linting, tests, and type checks.
- Provide a working preview. Give engineers access to the updated interface so they can inspect its behavior alongside the code.
- Resolve review feedback. Use AI assistance to address failed checks, code review comments, and merge conflicts before handing the changes over.
For example, an analytics dashboard can reach engineering with its charts, filters, responsive layouts, and interaction states already implemented. Engineers can review the actual frontend rather than reconstruct its behavior from Figma screens.
The goal is to hand over working, validated UI that's ready for technical review—not another set of design specifications that needs to be interpreted and rebuilt.
Step 7. Let engineering take the working UI to product prototype development
A review-ready pull request marks the transition from design-led implementation to engineering. The designer has already built and validated the interface, but getting it into production requires a different set of responsibilities.
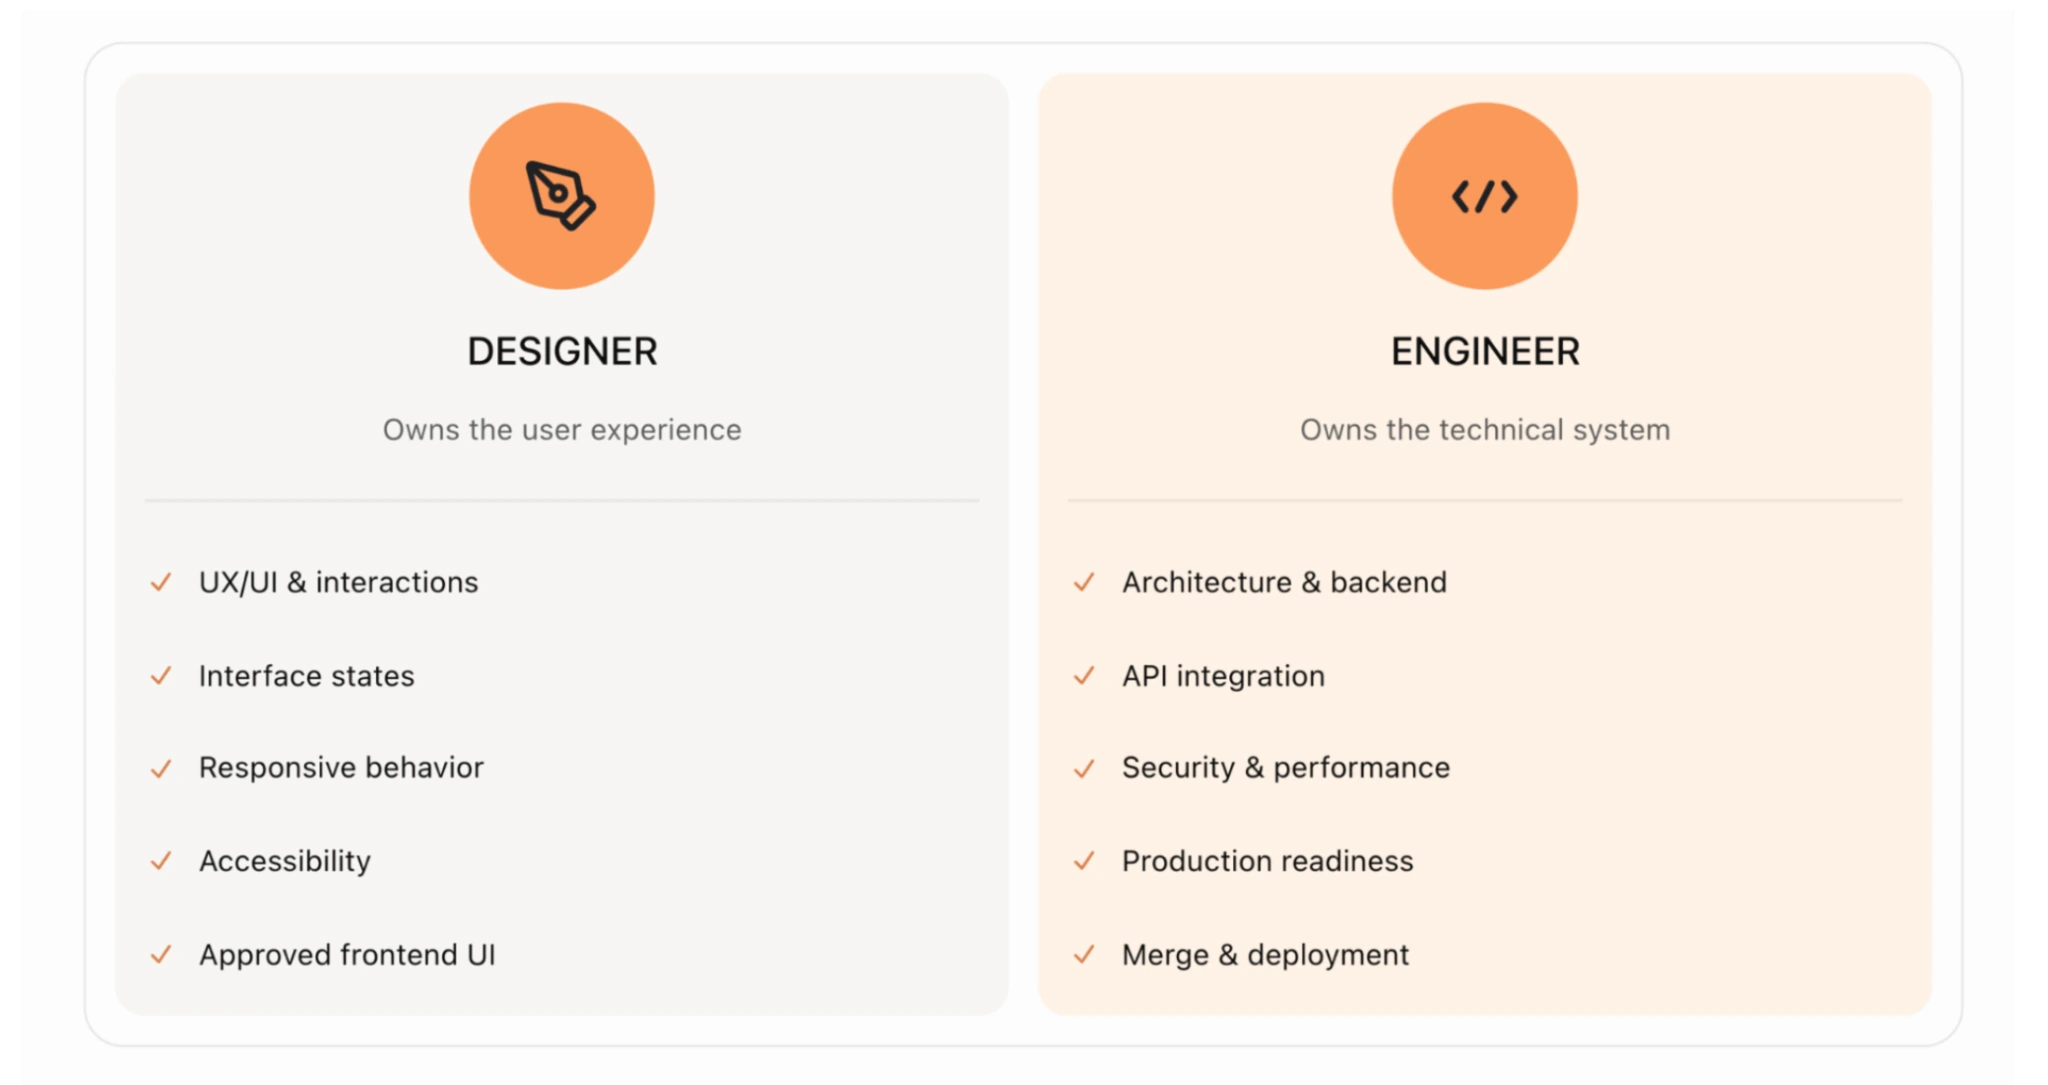
Here's where the ownership is divided:
- Designers own the user experience: UX/UI, interactions, interface states, responsiveness, accessibility behavior, and the frontend representation of the approved design.
- Engineers own the technical system: architecture, backend, API integration, security, performance, production readiness, and the final decision to merge and release the production prototype.
From here, engineering takes the lead:
- Review the frontend code. Check its quality, compatibility, and technical constraints.
- Complete integration. Connect the interface to real APIs, data flows, authentication, and backend logic where needed.
- Verify prototype implementation readiness. Run integration tests, address technical issues, and confirm the feature meets release requirements.
- Merge and deploy. Approve the changes and release them through the established development process.
For example, a designer might deliver an analytics dashboard with working filters, charts, responsive layouts, and error states. Engineers then connect it to real reporting services, optimize queries, and enforce server-side permissions.
The designer stays involved when needed, clarifying UX decisions, reviewing changes that affect the experience, and helping resolve usability issues. But engineering remains responsible for the technical system and release.
The advantage is that engineers receive a working, validated interface rather than static specifications. They can focus on making it production-ready instead of rebuilding the experience from scratch.
How the prototype-to-production workflow works in real projects
At Eleken, a UI/UX design agency for Saas, AI-first design means the designer doesn't stop at a polished concept. They work with AI to turn design decisions into functioning frontend code, test those decisions in the product, and prepare the implementation for engineering review.
To give you a closer look at how we actually work with AI, we'll walk through our AI-first approach and share examples from a real project where we redesigned the Settings navigation for a SaaS product.
1. Starting with the problem, not the AI-generated solution
Before building anything, the designer needs to understand what should change and why. That may involve reviewing the existing experience, identifying usability issues, examining competitors, and clarifying priorities.
AI can help explore possible solutions, but it doesn't determine which direction is right for the product.
In the Settings navigation project, the designer's task was to rework an existing part of the application. That meant the new interface had to make sense within the product's established structure, not simply look convincing as a standalone design.
The focus, then, was on finding a solution that genuinely improved the navigation experience while fitting naturally into the existing product, rather than simply choosing what AI could generate.
2. Working in the existing application whenever possible
Whenever possible, designers should run the application locally to work with real functionality and existing components.
For the Settings navigation redesign, our designer accessed both frontend and backend repositories, set up the application with an engineer's help, and continued working independently with Claude Code.
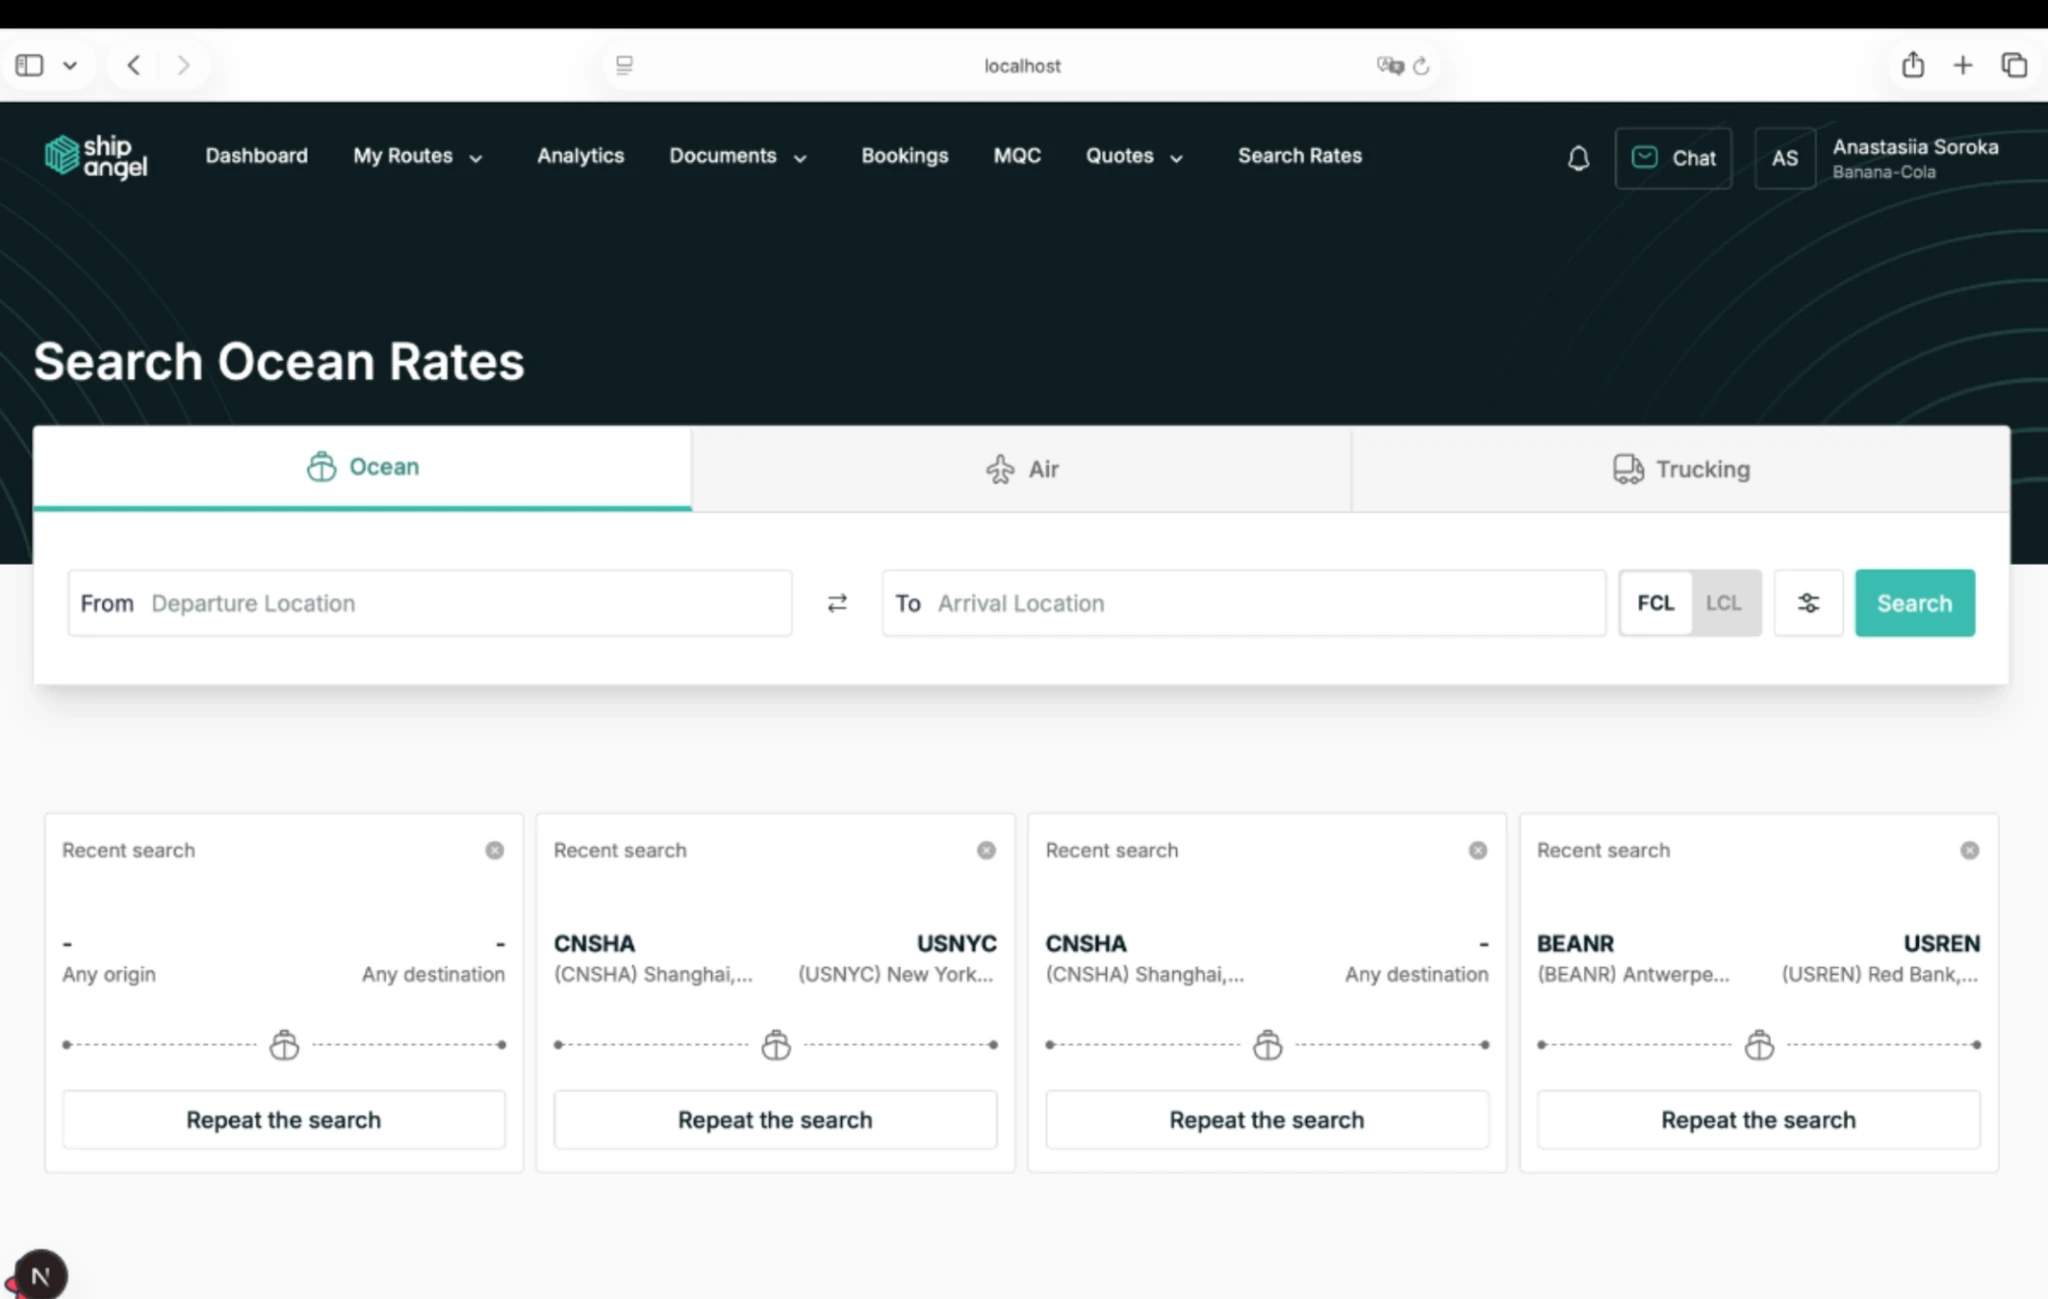
Such a setup changes how design decisions are made:
- The existing interface provides context. The designer can examine how the navigation fits into the rest of the application.
- The codebase provides constraints. Claude Code can reference the components and implementation patterns already used in the product.
- The running application provides feedback. Changes can be evaluated through actual interactions rather than static screens.
Instead of building a separate prototype and later asking engineering to recreate it, the designer can code a prototype within the product itself.
3. Exploring alternatives before implementing the chosen approach
The designer uses AI to consider possible directions, assess their tradeoffs, and refine the selected solution.
For the Settings navigation task, this meant working through the design approach before asking Claude Code to implement the changes.
Once the direction was established, implementation happened on a separate feature branch.
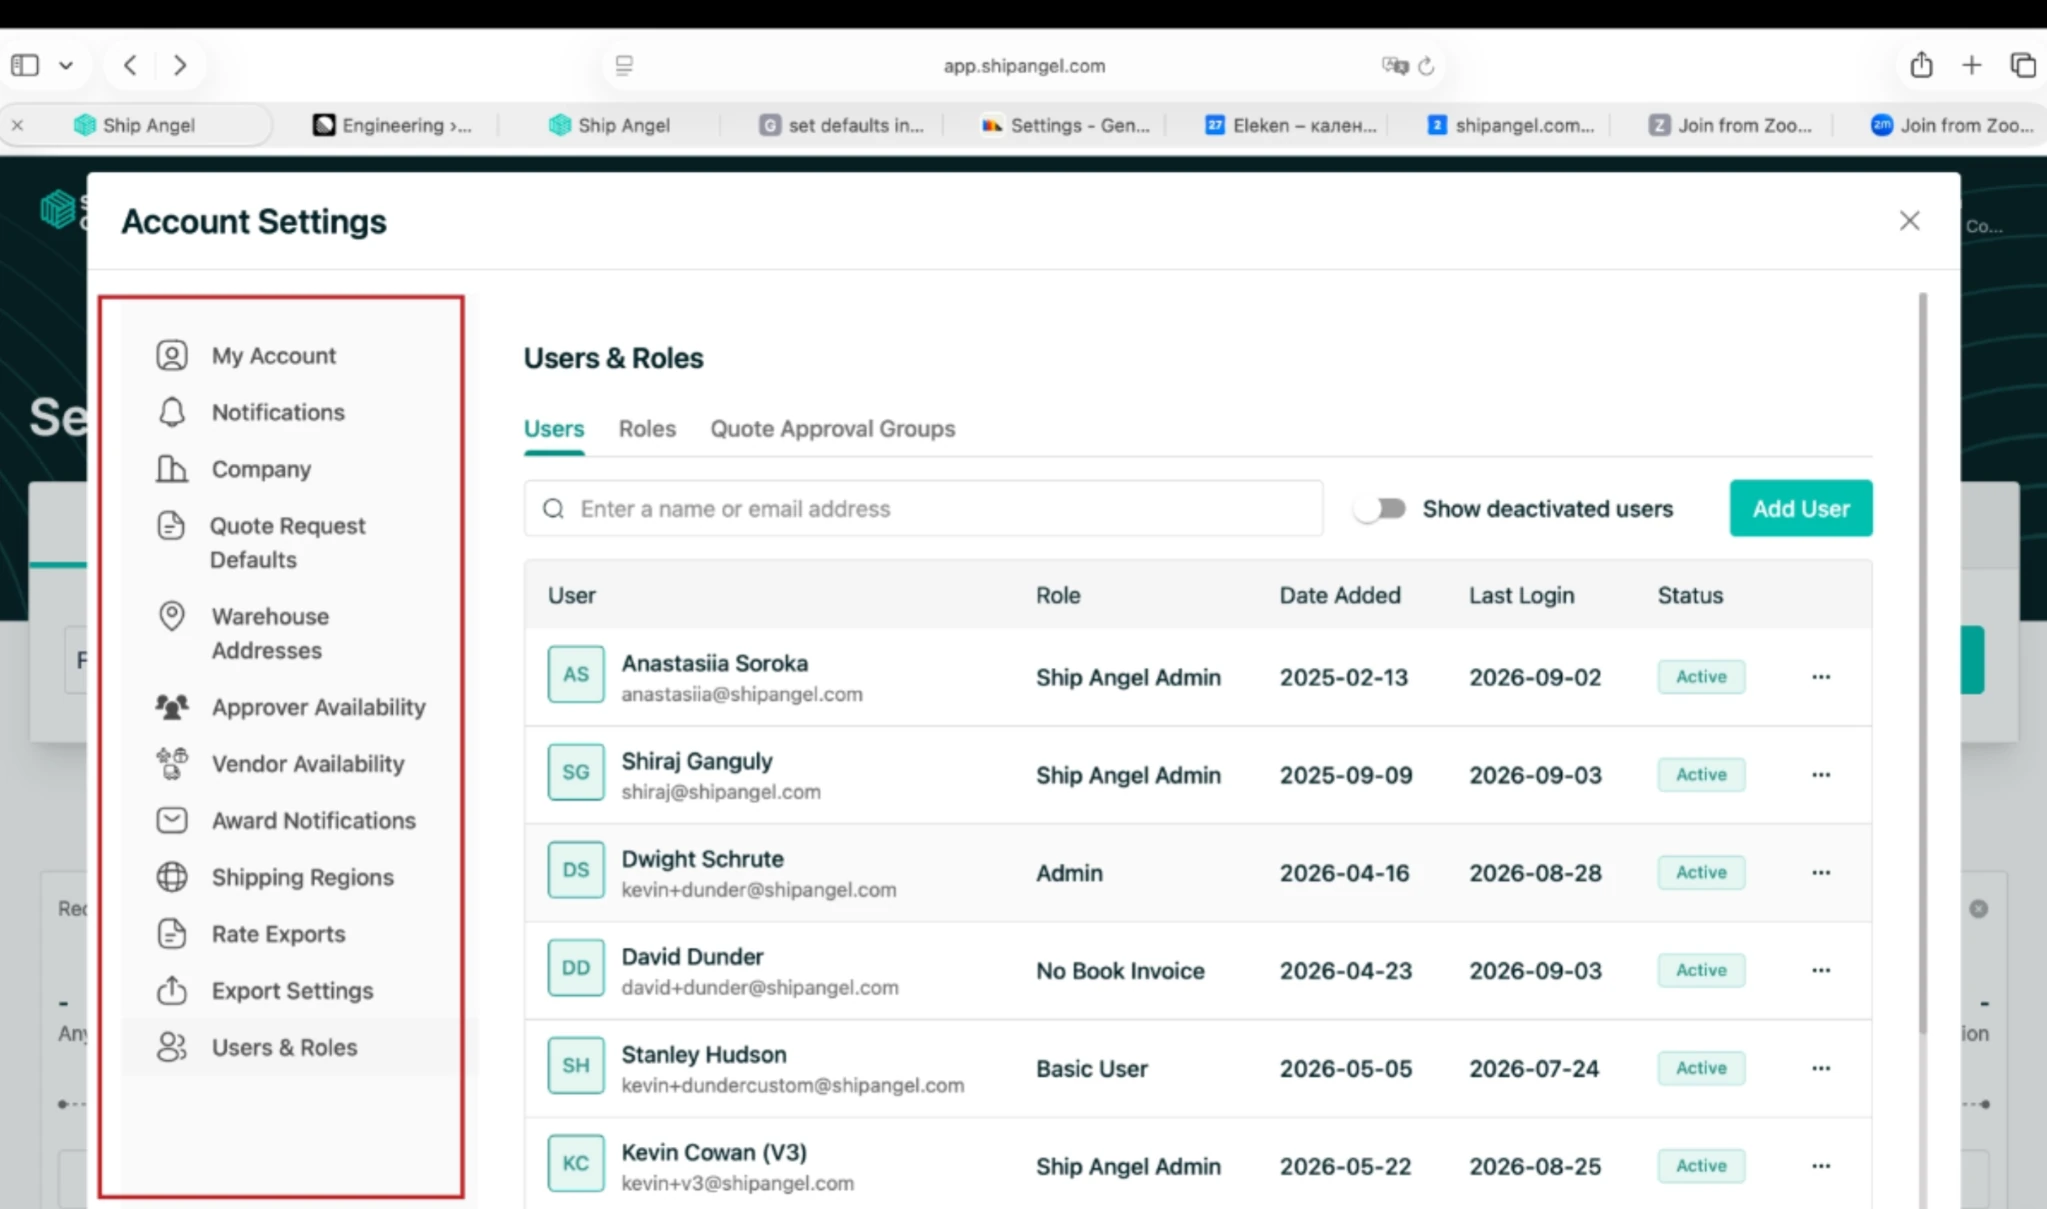
The designer could then compare the updated interface with the original application and continue refining it.
The key difference is that design exploration and frontend implementation are connected. The designer doesn't need to finish an entire set of static specifications before seeing how the proposed experience works.
4. Testing and refining the interface in the running product
AI-generated code can make an interface functional quickly, but that doesn't guarantee good UX.
The designer still needs to check whether the interactions make sense, whether the interface handles different states, and whether it follows the product's existing conventions.
In the Settings navigation session, the designer could inspect the implemented changes directly in the running application and use Claude Code to make corrections.
This approach supports a short feedback loop:
- Implement a change with Claude Code.
- Inspect the result in the application.
- Identify UX or implementation problems.
- Refine the code and test again.
Existing components, design tokens, and references such as Storybook help keep those iterations consistent with the product.
Figma can also be used when visual exploration or documentation is helpful. It doesn't have to become a separate stage where the same interface is recreated before development begins.
5. Handing over a working pull request, not just design specifications
Once the frontend changes are ready, the designer uses Claude Code to prepare a pull request.
In the documented Settings navigation workflow, this meant bringing the implementation into the team's normal engineering review process.
The handoff includes:
- Frontend changes implemented on a separate branch.
- A pull request explaining what was changed.
- Automated checks such as linting, tests, and type checks.
- A working preview for reviewing the interface.
- Follow-up corrections when checks or reviewers identify issues.
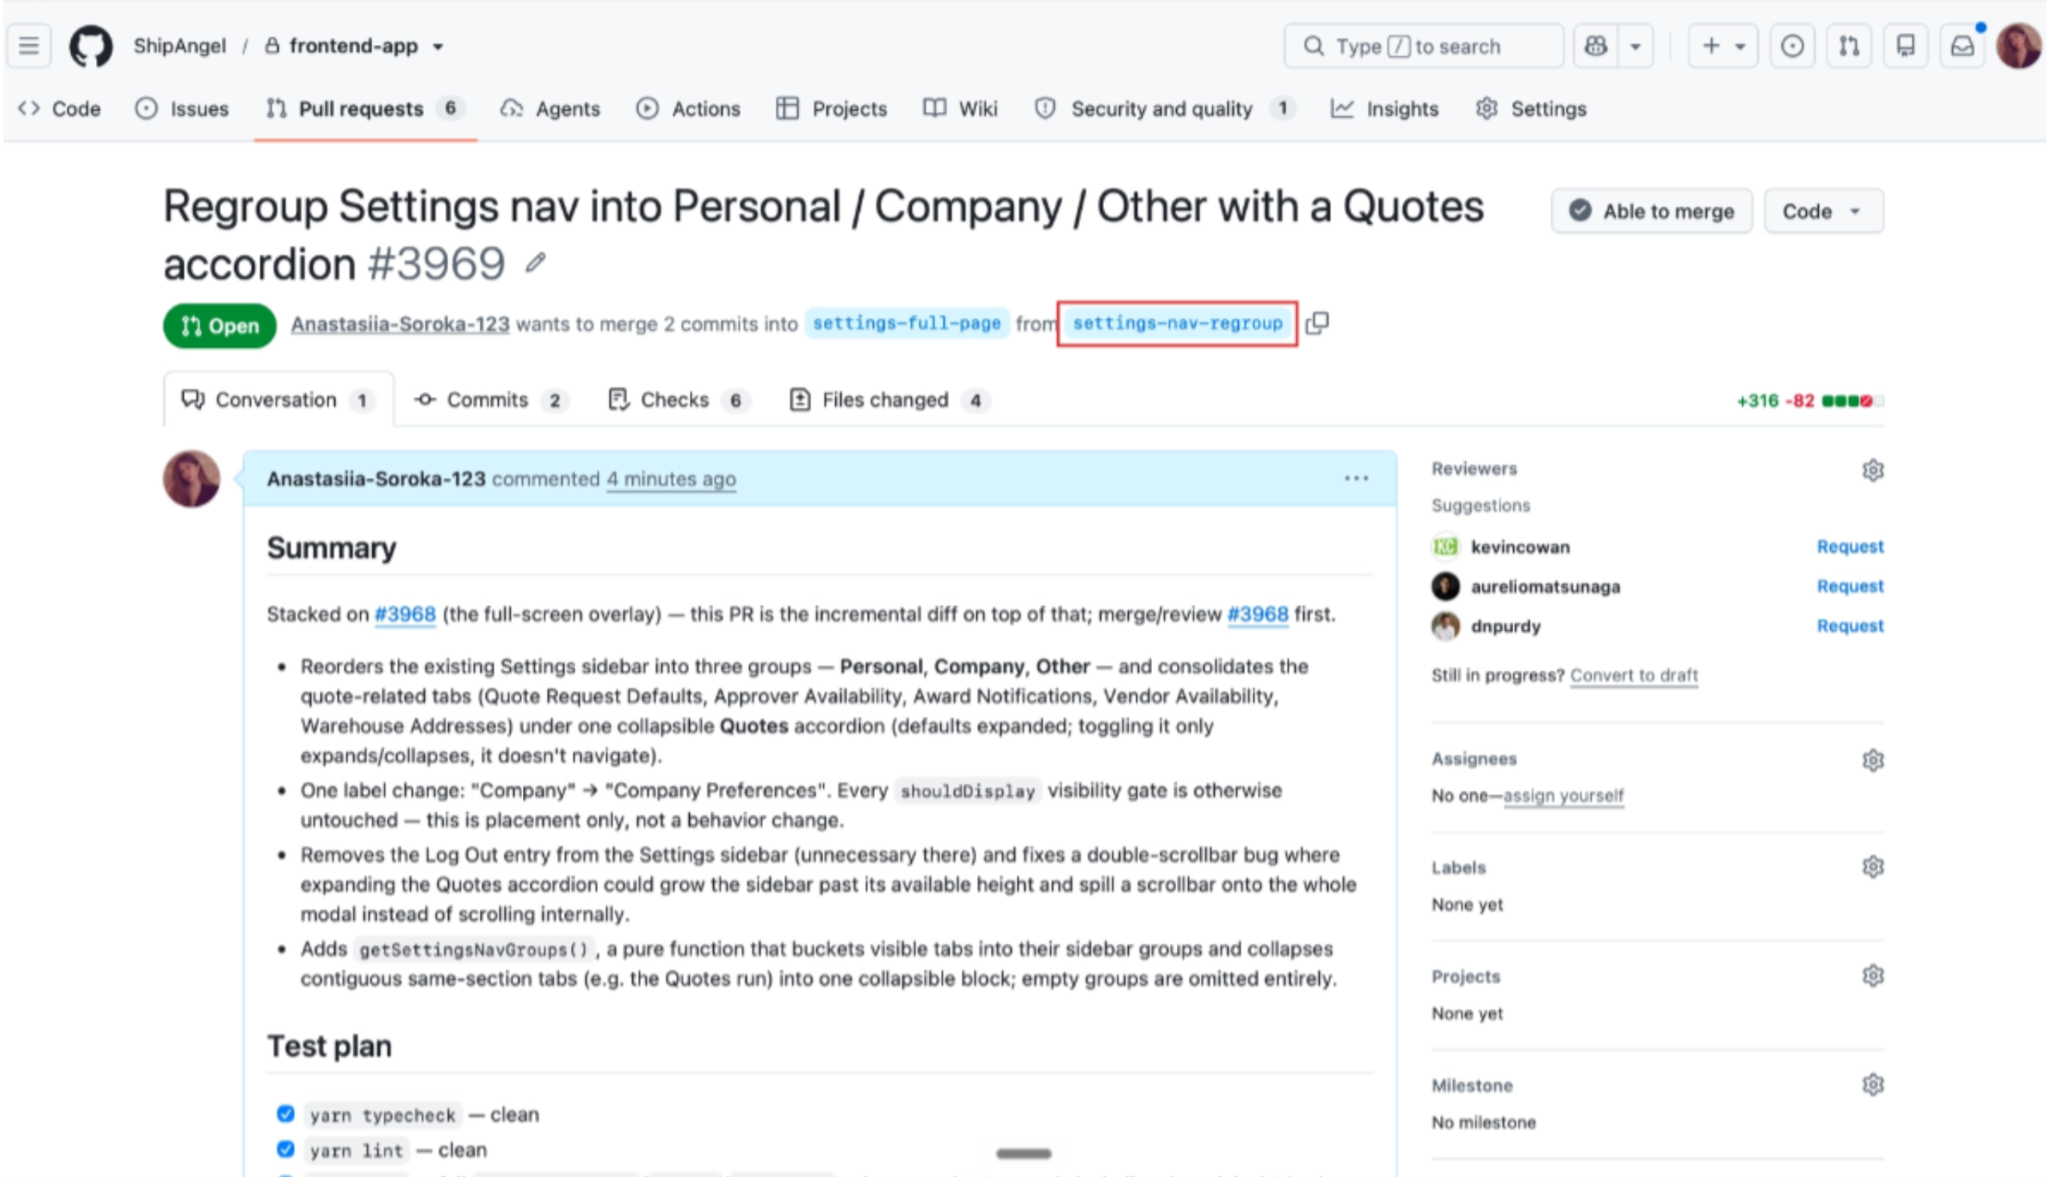
The designer can use AI to resolve review comments and failed checks. The pull request arrives at your team green, with comments addressed and no conflicts. Your engineers retain responsibility for reviewing the code, completing technical integration, and deciding what gets merged and deployed.
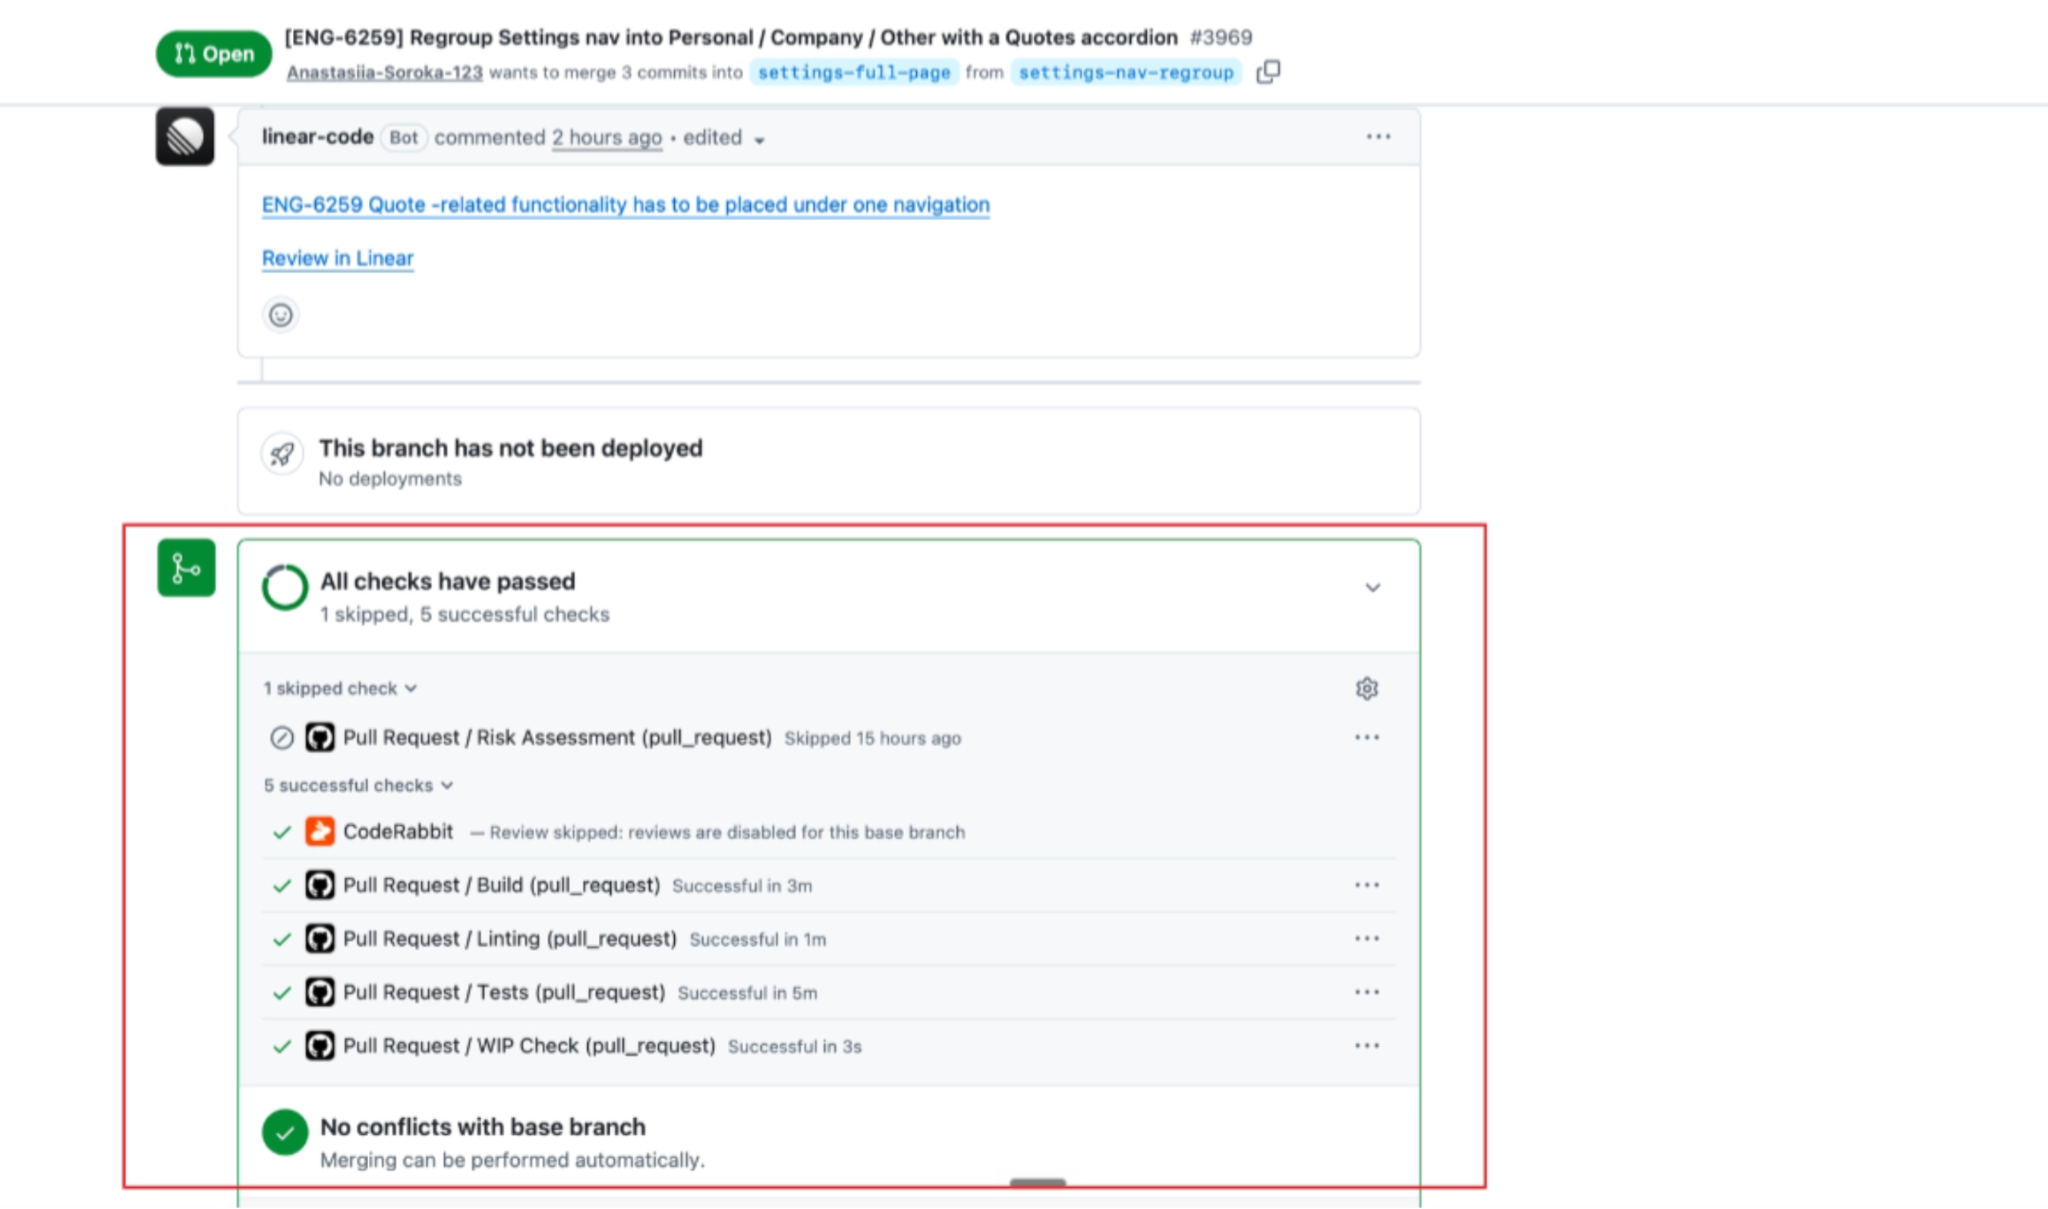
So instead of reconstructing the navigation from static designs, engineers can review an implementation that already expresses the intended interactions.
6. Keeping the designer involved through review and validation
The designer's involvement doesn't end when the pull request is opened.
They can clarify UX decisions, review changes that affect the experience, and help resolve issues discovered during engineering review.
After release, the team can also return to the original product goal and evaluate whether the change delivered the intended improvement.
The internal Settings navigation example documents the implementation and review workflow, not a measured post-release outcome. So we can't claim that this particular change improved usability or a product metric without additional evidence.
What the example does demonstrate is a different way of working: the designer carries the solution from UX reasoning into working frontend code, while engineering remains responsible for making it production-ready and releasing it.
That reduces the amount of interpretation required between design and development without removing the technical checks that production software needs.
From prototype to production process: Build on what you've already validated
AI has made it easier than ever to turn ideas into working prototypes. But the real opportunity isn't just to prototype faster. It's to avoid starting from scratch once a design is approved.
When designers use AI to explore solutions, refine interactions, and build with existing product components, a prototype can gradually become a working frontend implementation. Engineers can then focus on integration, technical quality, and getting the feature ready for release instead of recreating an experience that's already been tested.
Moving from prototype to product shouldn't mean doing the same work twice. The goal is to preserve what works, improve what doesn't, and carry validated design decisions all the way into the final product.
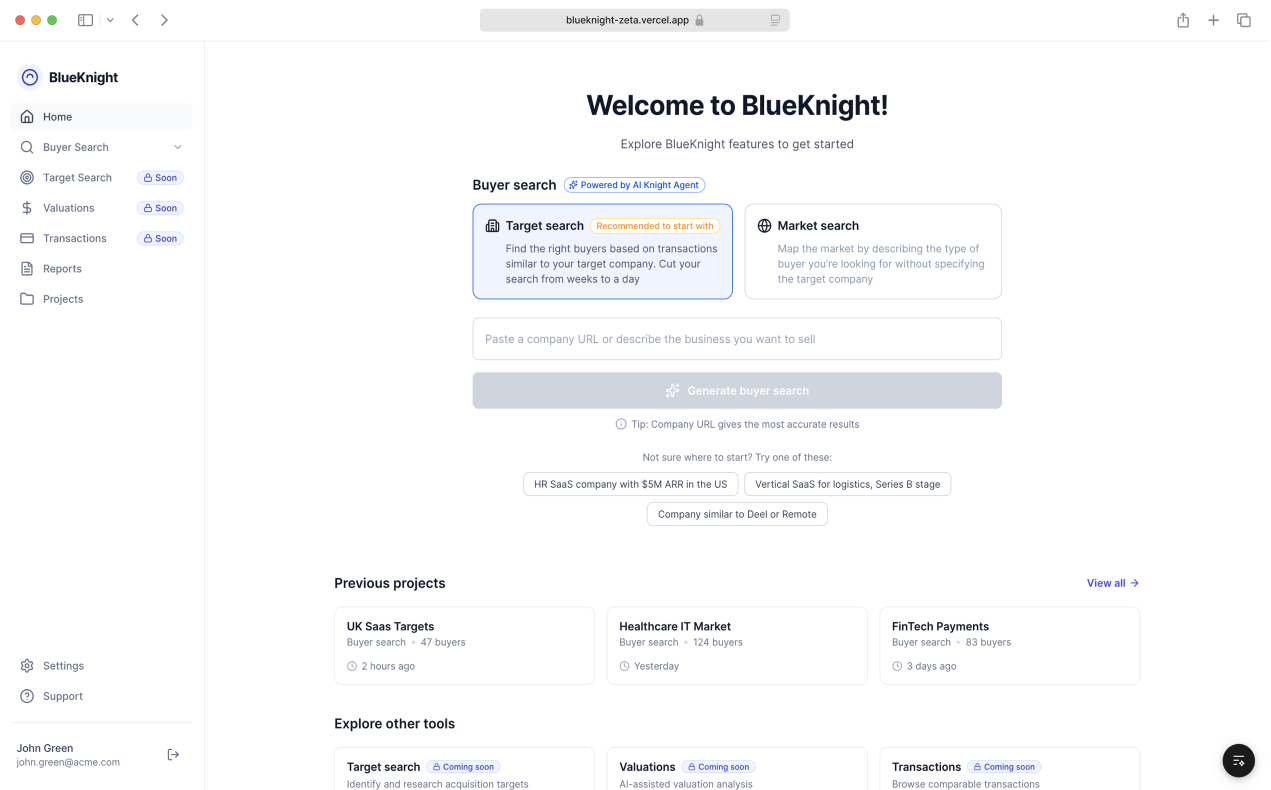
BlueKnight — AI-generated product dashboard
A quick Claude-generated prototype showing how AI can move from rough product logic to a usable dashboard interface — the kind of early concept a SaaS team can review before investing in full design.
If you want to move from prototype to development with less rework and fewer handoffs, get in touch with Eleken to see how our AI-first product design engineering approach can help.